You are thinking about starting a blog!
I am sure you are excited to start your own blogging journey and you totally should be!
Blogging can be a very profitable side hustle or even a full time business. If you do everything with a good strategy and a clear mindset then no one can stop you from achieving this online success and freedom.

You might have seen many bloggers online who had little to zero knowledge about blogging when they first started and now they have a full blown online business.
The interesting and wonderful thing about blogging is that you don’t have to be a pro or blogging guru to get started with it. Anyone can start a blog! And like I said, if you do it with a proper strategy then the chances of success increases.
You have to implement these strategies before and after starting your blog and that’s why I created a free 30-Point Blog Launch checklist for you to get started.
And don’t worry! Even if you have already started your blog, you can still skim through this checklist so you won’t miss anything.
This checklist includes everything you need to do before and after launching your blog + Which blogging tools you need for your blog.
You can either click here to access the free list or fill out the form below.

Let’s get started!
- 1- FIND OUT WHAT YOU WANT TO WRITE ABOUT, PICK A NICHE
- 2- DO SOME BASIC RESEARCH
- 3- WRITE 5 BLOG POSTS
- 4- CHOOSE A DOMAIN NAME
- 5- GET A GOOD HOSTING
- 6- INSTALL WORDPRESS
- 7- DESIGN YOUR BRAND
- 8- DESIGN YOUR WEBSITE
- 9- CREATE ESSENTIAL PAGES
- 10- START BASIC SEO
- 11- CREATE LEGAL PAGES
- 12- ADD SECURITY TO YOUR SITE
- 13- OPTIMIZE YOUR SITE FOR MOBILE USERS
- 14- REDUCE THE PAGE LOAD SPEED OF YOUR SITE
- 15- CREATE SOCIAL MEDIA ACCOUNTS
- BLOG LAUNCH CHECKLIST: CONCLUSION
1- FIND OUT WHAT YOU WANT TO WRITE ABOUT, PICK A NICHE
The very first task is to find out what you want to write about. Choose your blog niche. A niche simply means topic. It can either be a small niche or a niche that covers a much broader topic.
I really recommend to write on those topics/niche in which you are interested in.
Let’s say, you chose a niche just because you read somewhere that it’s very profitable but you have no knowledge about that niche whatsoever. Would you really enjoy writing your blog posts? You’ll end up burning out!
And now let’s say, you chose a niche because it’s something you are genuinely interested in. You’ll enjoy each and every step of your blog creation. You’ll be excited about it!
Trust me choosing a niche in which you are interested in makes your whole blogging journey a million times more enjoyable.
One more thing, make sure your niche has an audience to get some sweet blog traffic. Research about your audience as well like their age group, Gender, Demographics etc.
Related: 130+ Best Blog Niche ideas to start your own Blog
2- DO SOME BASIC RESEARCH
Find out who your fellow bloggers are in your niche and what type of content they are creating. Take some inspiration from them.
You can also find different ways on how you can make your content better than their content.
In blogging, other bloggers should not be considered as your competitors. You can call them your blogging mates 🙂
Connect with them and ask for tips and advices. Collaborate with them in the future!
You can use Moz’s free competitor research tool to find some fellow bloggers within your niche.
Research about which topics in your niche is trending using Google Trends.
3- WRITE 5 BLOG POSTS
Now that you have picked a niche and researched about some fellow bloggers, trending topics etc., the next step is to write at least 5 blog posts before purchasing a domain and hosting.
5 blog posts are minimum to show your viewers what to expect from your blog and what’s coming in the future.
You can write the blog posts in Google docs, Microsoft Word or anything you are comfortable with. Save these posts.
We will discuss about these blog posts later as they still need some final work to be done.
4- CHOOSE A DOMAIN NAME
Choose a name of your blog which is both relevant to your niche and easy to remember. Take your time to choose a good domain name as it’s permanent and cannot be changed again.
If you are having trouble finding a good domain name, you can use this tool called Namelix as it gives you a lot of ideas for a domain name.
Once you choose a suitable domain name, check its availability on Godaddy because a domain name must be unique. Avoid using symbols or hyphens and choose .com as your URL extension.
Now let’s move on to the next step!
5- GET A GOOD HOSTING
A hosting service is basically where all the files and documents of your site are stored. Choose a hosting services which is trusted and fits in your budget.
You can either choose a hosting service where you can purchase both domain and hosting simultaneously or you can purchase domain and hosting separately.
Make sure to do your research before choosing a good hosting service.
Related: 5 Best Web hosting services to start your blog (affordable and trusted)
6- INSTALL WORDPRESS
WordPress is a website builder where you can control the backend of your whole site. It’s the most popular, trusted and easy to use website builder.
The great thing about WordPress is that you can install plugins which works as essential and helpful tools that will help you with blogging.
After installing WordPress, you’ll see some pre installed plugins. Delete them and then install only those plugins which you find useful. There are many plugins that are a must have for blogging.
PRO TIP:
Always check the number of ‘active installations’ before installing a plugin. This reduces the risk of hacking of your site. If the number of active installation is in thousands then it’s safe to install it.
Here are other things you must do after installing WordPress:
- Delete all the default pages and posts.
- Disable/enable comments through settings>Discussions on the left panel.
- Change settings such as time zone, language, date format etc. through setting>General.
- Make sure search engines indexes your site. Go to settings>Reading and untick the ‘Discourage search engines from indexing this site’ option.
- To make your URL’s look nice and clean, go to settings>permalinks and choose the permalink structure as ‘Post name’.
7- DESIGN YOUR BRAND
Now, before designing the website, you need to design your ‘blog brand’ to make your site look more professional.
The very first thing is to choose a color palette for your site. If you have no expertise in choosing good color combinations, you can use this free tool called coolors to create beautiful color palettes.
I recommend choosing bright, accent, fresh colors to make your site look more aesthetic and visual. Avoid using dark colors such as black, brown, grey etc.
Now. it’s time to design your blogs’ logo using a free tool called Canva. Canva is the best friend of every blogger. Try different logo designs, test and play around to create a site logo which matches the color palette.
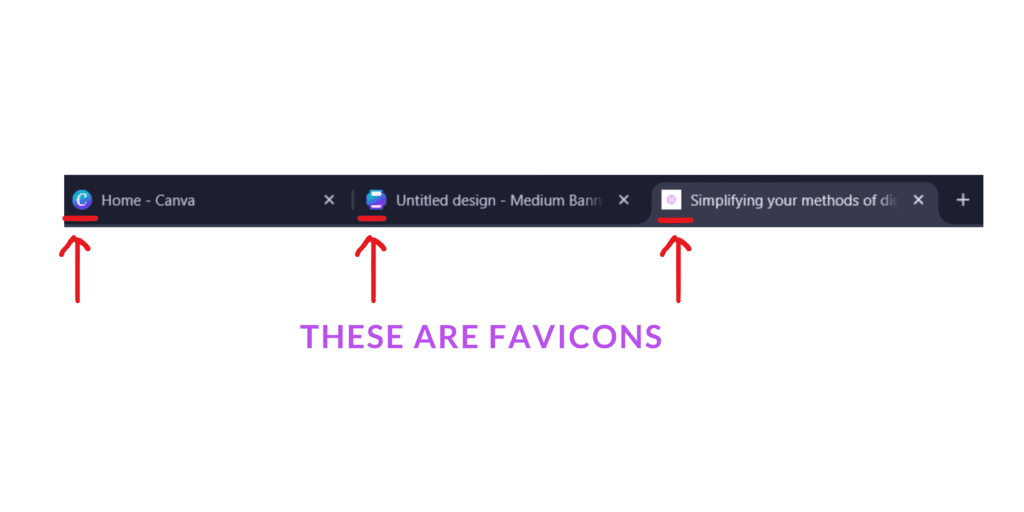
You also need a site icon or favicon. It’s the little icon which you see on the left side of each tab of a site when you open it on search engines (see the image below).

After designing the logo and site icon, you need to upload it on WordPress. In order to do that:
- Go to Appearance>customize. A new interface will appear.
- On the left panel, go to Site identity and upload the favicon there.
- To upload the logo, go to header>logo and upload the blog logo there.
Of course there are other ways to customize and upload the logo, this is just the basic WordPress customizer.
8- DESIGN YOUR WEBSITE
Now comes the most fun and frustrating step. Designing the website!
The very first step is to choose a clean, easy to customize and good looking theme. You’ll get many free themes in WordPress itself if you go to appearance>themes. The most popular free WordPress themes are Ocean wp and Astra.
If you want to purchase a theme, there are many good options available. The most popular are bluchic themes and blossom themes. There are many other options too, I just told you some of my favorite themes.
After installing the theme, start customizing and designing it using the color palette you chose earlier. But first create some essential pages.
9- CREATE ESSENTIAL PAGES
You can create pages before or after installing a theme. To create a page, go to pages>add new page. Give a title to your page, for example, if you are creating a home page, name it ‘home’/’home page’.
Click publish on top right and repeat the same process to create other pages.
There are three must-have pages for your site (excluding the home page):
- Blog page
- About page
- Contact page
In the beginning, you don’t really have anything other than your blog posts so these three pages are a must to add to your site. There are also legal pages you need on your site about which we will discuss a bit later.
10- START BASIC SEO
Now that we have a website with all the essential pages and some pre written posts, it’s time to do some SEO.
If you are not familiar with SEO, it basically stands for Search Engine Optimization which means optimizing your website to rank it higher on search engine result page (SERP) and increase it’s visibility.
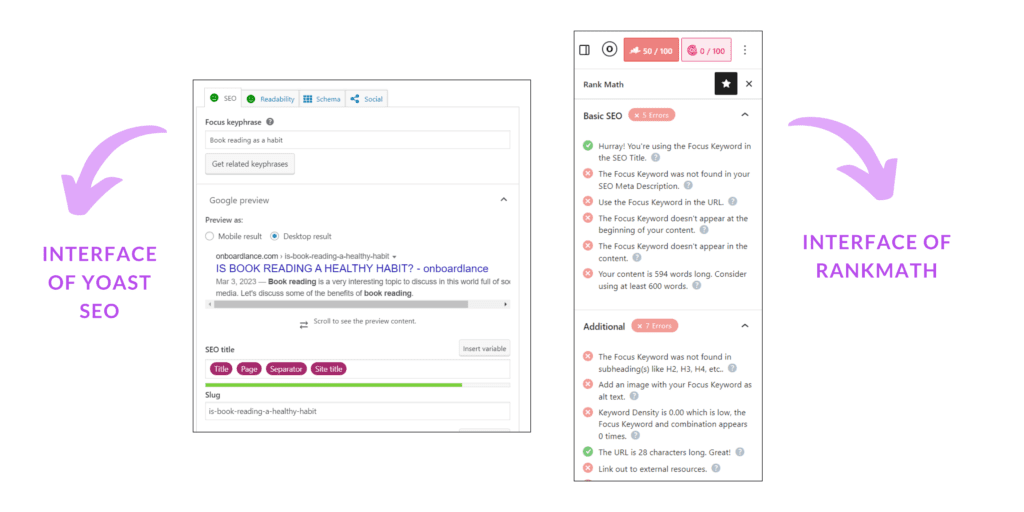
There are many plugins available to help you do SEO of your website but the most popular and trusted ones are Yoast SEO and Rankmath. You can install any one of these two, both are equally good.
Upload your pre written 5 blog posts through Posts>add new post and hit publish.
You’ll see the interface of these plugins in the WordPress blog post or page editor. For Yoast SEO, the interface is present at the very bottom of the blog post/page editor and for Rankmath, the interface is present at the right side of the blog post/ page editor.

Optimize the meta title, meta description, URL of the post and pages. But before this, you have to conduct a keyword research. Let’s understand this whole process with an example:
Let’s say, you want to write a post on ‘how to make a chocolate cake’. So the ‘seed keyword’ here is ‘chocolate cake recipe’. Now use this keyword in the Title, description and URL of your post. Also make sure to use the keyword in the content of your blog post.
These plugins actually tells you where exactly to use your keywords and how many times. Along with that, these plugins also submits a sitemap of your website to search engines so that the robots of the search engine ‘crawls’ your website.
SEO is a much broader topic then this. I just explained the basics here. You’ll eventually learn much more about it as you continue with your blogging journey.
Related: 3 Google SEO tools every blogger must have!
11- CREATE LEGAL PAGES
You don’t want to miss this step if you want to protect your blog legally. There are 3 pages you must have on your site to make your blogging biz legal.
- Privacy policy page
- Terms of Service page
- Disclosure page if you are an affiliate partner
You can easily create these pages using a tool called Termsfeed. All you have to do is fill out some basic information and this tool will create legal pages for you.
Create this pages on WordPress through Pages>add new page, give the page a title and copy paste the whole thing here which Termsfeed created based on the information given.
12- ADD SECURITY TO YOUR SITE
It’s important to add security to your website to avoid any possibility of hacking. Install a plugin called Wordfence to make your site safe and secure.
Update the theme and plugins from time to time and make sure to update WordPress whenever a new update comes.
To log in to your WordPress dashboard, you need a name and a password. Make sure the name is not something easy like ‘admin’ and the password is not ‘yourname123’. Set a complex password that is not easy to guess.
13- OPTIMIZE YOUR SITE FOR MOBILE USERS
Don’t ignore mobile users. In today’s world, almost everyone has a mobile phone which they use to search up something in the internet.
Imagine what would happen if someone visits your site through their mobile phone and it’s impossible to interact with it. It would be really frustrating. It could affect the user experience of your site.
So make sure to get this step off the checklist. Also make sure, the anchor texts and buttons are clickable, just in case.
14- REDUCE THE PAGE LOAD SPEED OF YOUR SITE
A good page load speed of a website must be between 0-4 seconds. To check the page speed of your site, use a tool called Page speed insights.
If the page load speed of your site is slow then one main reason could be the size of the images. Compress heavy images using a plugin called ‘Smush’.
You can also use a plugin called ‘Lite speed cache’ to make the pages load faster.
15- CREATE SOCIAL MEDIA ACCOUNTS
The best way to engage with your audience is through social media, no doubt about it. You don’t have to be active on every platform, just focus on one or two at a time.
Promote your blog posts on social media, announce it to the world! Respond to the comments and receive feedbacks.
I really recommend creating a Pinterest account to promote your blog and bring traffic to it. It is the secret weapon of every blogger. Make it your best friend too. Join communities and group boards to collaborate with fellow bloggers.
Attach your social media accounts to the footer (and the sidebar too, if you have it) of your website so that your viewers can follow you and you can interact with them easily.
There are 15 more points in the free downloadable and editable checklist which I created especially for passionate people like you!
This checklist includes all the things you must do before and after launching your blog. Just fill up the form to download it for absolutely free!

BLOG LAUNCH CHECKLIST: CONCLUSION
Did you find this checklist useful? Let me know in the comments below as I am excited to hear your thoughts!
Also make sure to pin this post for later 👇


Thanks for the great post. I’m still new to blogging and I am going to follow a couple of things that you mentioned.
Thanks Stacie, glad you found this helpful!
This post would have been a great blog for me when I first started my blog a few years ago. But it is still insightful and informative for me. Thanks for sharing.
That’s so good to hear, Kevin!
Didn’t have this checklist when starting, glad to see I didn’t miss anything.
That’s so nice to hear, Saviour!
Very useful insights for who wants to finally start their blog. Great tips
Thanks Catalina!