Are you a blogger or an online business owner? Then it’s about time you build your own email list.
It doesn’t really matter if you have thousands or millions of social media followers. Those are not considered as your ‘real’ followers.
Your ‘real’ followers are considered as your email subscribes because those people are genuinely interested in your products or services.
And there are many many benefits of building an email list.
You just published a blog post. Just send an email to your subscribers and notify them that you just posted a new post.
Or you just launched a course, e-book or any digital product. Let your subscribers know about that and make them aware.
But wait….
Before you do any of these things, you need an email marketing tool. There are plenty of email marketing tools available such as ConvertKit, MailerLite, MailChimp, SendinBlue etc. I wrote a post about them too. You can check them out here.
But in this particular post, we are going to discuss about my favorite email marketing tool which is MailerLite. And the best part is that it’s completely free to use!
We will discuss everthing about how to use MailerLite and will cover all the topics such as what is MailerLite, how to sign up for free, how to verify your domain, how to create your first ever form and much more about email marketing in general.
Since I am a blogger and I teach everything about blogging here on this site, I am going to discuss everything in terms of blogging in this post.
So, without any further ado, let’s jump straight to the topic.
Some links in this post are affiliate links. If you purchase through these links, I earn a commission at no extra cost to you. I only recommend products, tools and services that I trust. For more information, read the full disclosure here.
WHAT IS MAILERLITE?
MailerLite is a free email marketing tool through which you can build your own email list by creating forms, landing pages, etc.
This tool is mostly popular because of its simple and non-complex features which makes it really beginner friendly to use. This was the reason why I completely fell in love with this tool since the day I found it.
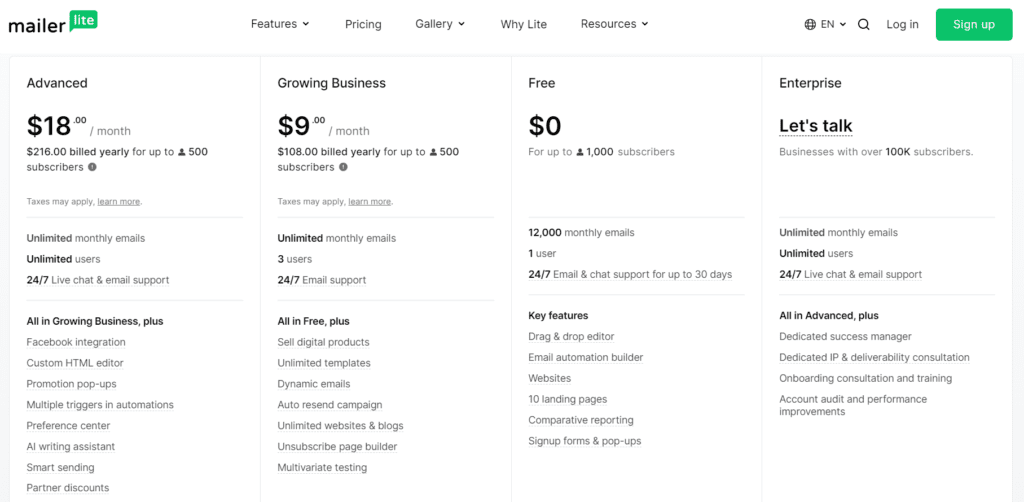
And what’s amazing is that you get all the features you’ll ever need to build your email list in the free version.
You only have to upgrade after you surpass 1,000 email subscribers. Pretty amazing, right?
Now you might be wondering about its features and how this tool will help you build your email list, am I right?
Ok then let’s discuss more.
The best features of MailerLite are:
⮞ Drag and drop email editor
⮞ Create automation
⮞ Create landing pages and forms
⮞ Segmentation and A/B testing
⮞ Analysis and reports
Let’s discuss each one of these features in more detail.
1. Drag and drop email editor
To create an email to send to your subscribers, you can easily design them using the drag and drop email editor which requires complex skills at all.
The drag and drop email editor is one of my personal favorite feature of this tool. You can customize your emails however you like and match them according to your branding.
The editor works so smooth and has a really clean look to it which makes it look even more professional.
2. Create automations
Another great feature which is so important for email marketing is automation. With the automation feature, you can create a workflow to send emails according to user behaviour.
For example- If you want to create a free email course to build your email list then you can create a workflow of emails using the automation feature. If a subscriber enrolls for the course then they will receive the course in their inbox automatically.
You only have to set up the automation process once and it will work on autopilot every time you gain a subscriber for that course.
3. Create landing pages and forms
You need forms and landing pages to be able to build an email list of your own.
Once a subscriber fills a form to get a freebie, course or any free product then they will be added to your email list.
These days you have to offer some free stuff such as opt-in freebies to your subscribers to build an email list. That’s where you can use the features of the customization of forms and landing pages.
You can design the forms according to your branding and then embed them on your site to make it look more professional. The interface is very user friendly and easy to understand too.
4. Segmentation and A/B testing
Segmentation is an advanced email marketing feature offered by MailerLite through which you can segment your subscribers according to their interests, behavior, demographics etc.
After segmenting them, you can send emails to different segments according to their interests for a much more personalized approach.
The A/B testing feature offers tools to test different versions of emails and then you can choose what works the best for you.
This way you can increase the open rates of your emails which will result in more conversions. That is your main aim with email marketing.
5. Analysis and Reports
A feature which you’ll definitely need the most. With MailerLite, you can see all analytics related to your subscribers, emails and forms.
It will tell you how many subscribers you gained, how many percentage of people opened your emails, how many people saw your opt-in form, how many clicked on your email etc.
And all of this information is really really important for your email marketing strategies.
So overall, MailerLite got all the features you’ll ever need in order to build your email list. And that’s why I absolutely adore this tool.
> Read More: How to use WordPress for the first time ever
HOW TO USE MAILERLITE: A STEP BY STEP TUTORIAL
Okay! It’s time to discuss the main focus of this post. Let’s learn how to use MailerLite in 6 very easy steps.
Now, as I’ve mentioned before, there are many tools available online which you can use to build your email list but the one which is personally love to use is MailerLite.
Reason?
It’s very simple to use which is perfect for beginners! You may know that on my blog, I teach new bloggers how to make blogging simple. That’s my aim! And MailerLite is a perfect tool which made building an email list very simple.
I remember when I used this tool for the very first time, I was like: “Woah! You really can do all of this so easily for FREE!”. Trust me, I am not sugar coating this.
But this is not about me. This is about you. I want to make things simple for you and that’s why I am creating this easy to follow tutorial so that you can build your own email list.
Let’s start!
How to use MailerLite for building an Email list:
⮞ Sign up for a MailerLite account for free
⮞ Make yourself familiar with the dashboard
⮞ Create an opt-in freebie
⮞ Create an embedded form
⮞ Create automations and add opt-ins
⮞ Send weekly emails
Let’s discuss these steps one by one.
STEP 1: SIGN UP FOR MAILERLITE
The very first step is to sign up for a free MailerLite account. This step is very simple. Just click this button and click on ‘Sign up’ on the top right to get started for free.
After clicking on the sign up button, fill up the information to create an account. The sign up form looks like this. Fill all the details carefully and click on ‘create an account’.
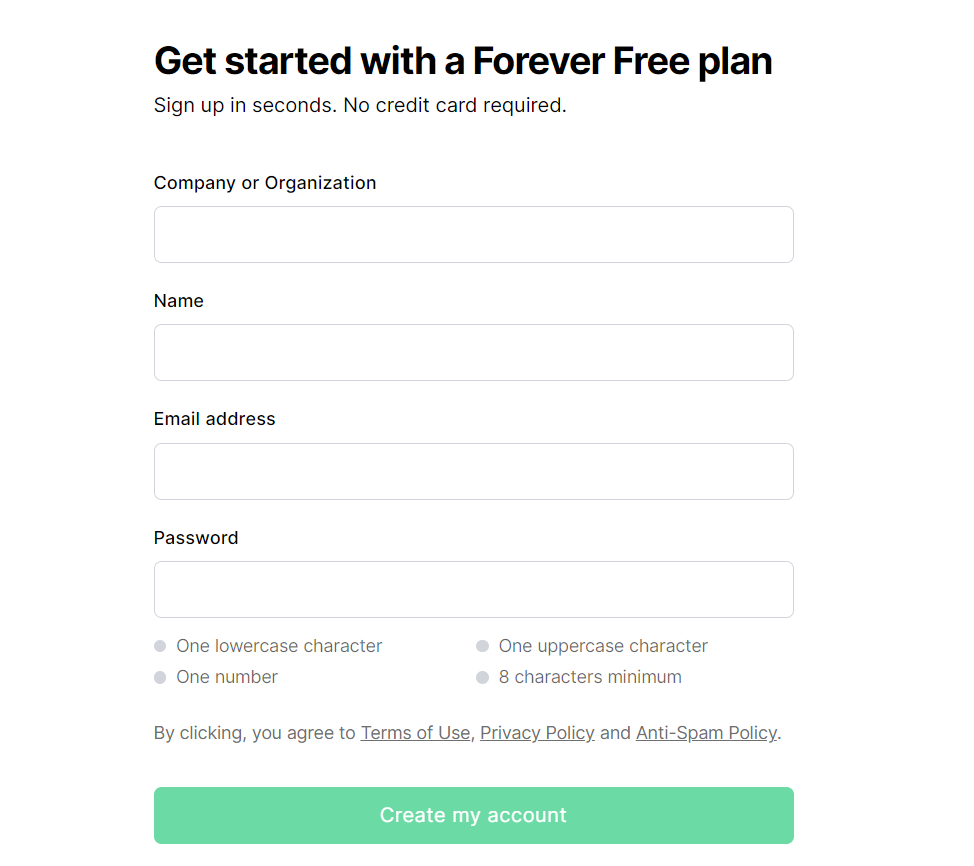
Please note that you’ll need a professional email in order to create a MailerLite account. The professional email must contain your domain name to continue.
MailerLite only accepts professional premium emails for sign up. You cannot create a MailerLite account with a free email such as gmail.com or yahoo.com. Reason behind this is to avoid spammy accounts.
In order to get a professional email account, you must have your own self hosted blog. The hosting company will offer a free email account and then you can proceed further.
For hosting, I recommend to go with Hostinger hosting if you haven’t started your blog yet. Hostinger offers free email account with their domain and hosting plan. I also have to full tutorial on how to start a blog for complete beginners.
Moving on.
After creating an account this is the next step you have to follow.
1. CONFIRM YOUR EMAIL ADDRESS
After you create your account, the next important step is to confirm your email address. Yes, the same email address which you used to create your account.
You’ll see the ‘confirm your email’ prompt as soon as you create your account. You can just click on ‘send confirmation’ button and then confirm your email address.
If, for some reason, you still haven’t confirm your email address, you can do this ↓
To confirm your email address, go to account settings < plan and billing and you’ll see the ‘confirm your email’ prompt. Click on ‘send confirmation’ and then confirm your email address.
2. COMPLETE YOUR PROFILE
After confirming your email, the next step is to complete your profile. You’ll see the profile competition interface just after confirming your email address.
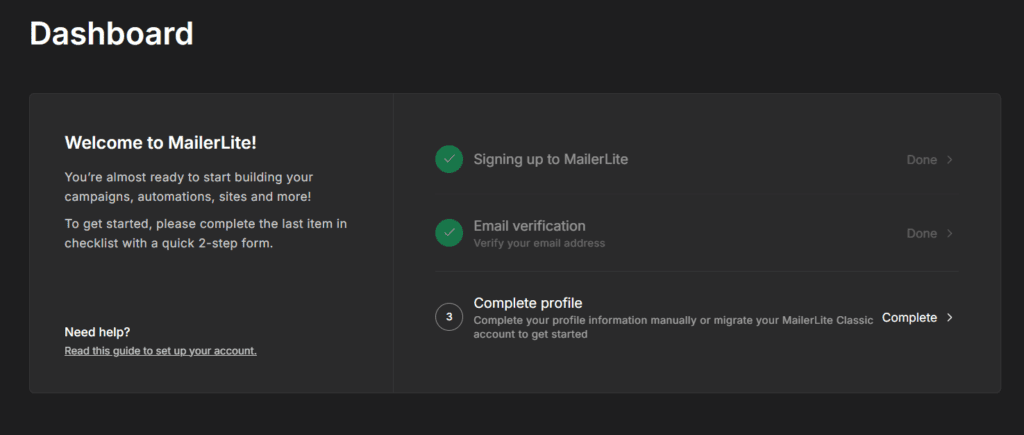
Just click on ‘Complete‘ besides the complete profile prompt and fill out the details of your account such as your name, time zone, why are you using MailerLite etc.
And you are done!
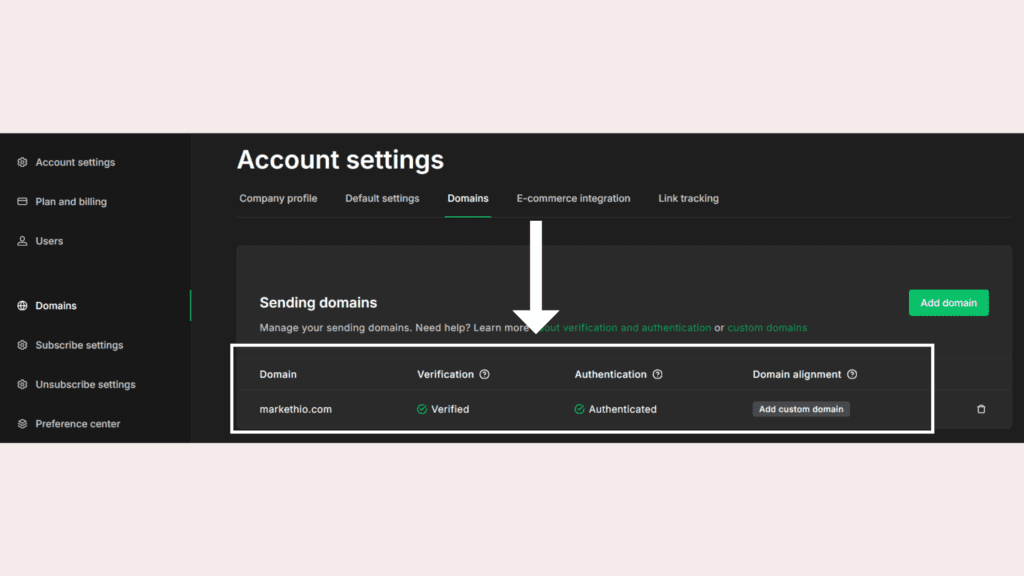
3. VERIFY YOUR DOMAIN
As I’ve mentioned before, MailerLite only accepts business emails which contains your domain name. Once you have verified your email and complete your profile, the next step is to verify your domain.
DO NOT SKIP THIS STEP!
This step is mandatory and the purpose is to avoid your emails from reaching into the spam folders of your subscribers and make it less spammy.
To verify your domain, go to account settings < domains and click on add domain. Enter your business email address and click save. Then head to your inbox and confirm your email address. The domain verification process is done here.
To authenticate your domain, click on authenticate. You’ll see a pop-up, just click continue.
You’ll see the name and value of the DKIM and SPF records. Don’t freak out! Just follow along. Just keep this tab open.
Go to the dashboard of your hosting provider and in the DNS editor (search it, you’ll find it!), add a new record.
For the DKIM record, choose the ‘CNAME’ record and paste the value from the tab in MailerLite. Don’t touch anything else and just add the record.
For the SPF record, choose the ‘TEXT’ record and paste the SPF value from MailerLite.
The DKIM and SPF record should match in order to authenticate your domain. It can take up to 24 hours to update so don’t worry if it says ‘not authenticated’.
If you find this process too technical, then you can ask your hosting providers too. They’ll do it for ya!
After authentication of your domain, you’ll see something like this ↓
And that’s it! Now we can proceed further.
STEP 2: GET FAMILIAR WITH THE DASHBOARD
After you are done with all of the above steps, now it’s time to make yourself familiar with the MailerLite dashboard.
On the main dashboard, you can see your total subscribers, email analytics like click through and opening rates, active automations and forms etc.
Since you just created your account, you may not see a lot of analytics on your dashboard for now.
As we progress through this guide, you’ll know everything related to how to create forms and automations so just stick with me.
There are few important settings which you have to save to make things easier for you.
On your dashboard, go to account ‘settings option‘ on the left panel and in the ‘company profile’ field, enter your blog details, country, time zone etc. and then click save changes.
Then in the ‘default settings’ field, fill out the important email details such as Name, email address, logo, social media links, company details etc. and then click save changes.
This way, whenever you create a new automation, all of the company details will already be there in your email. You won’t have to manually enter your details for each and every email.
MailerLite is very simple to use and you won’t have any problem knowing your way around it. That’s amazing, isn’t it?
Great! You are doing a great job so far. Let’s move on to the next step.
STEP 3: CREATE A LEAD MAGNET
It’s time to create an opt-in freebie to attract some subscribers to your email list.
But what is an opt-in freebie? In short, an opt-in freebie is a free resource which you offer to your audience in exchange for their email.
These days, just putting up a ‘subscribe to my newsletter’ form on your site doesn’t work at all. You have to offer some value to your audience in exchange for their email.
First things first, you have to come up with a freebie idea. For that, you can do the following things:
- Look at what your competitors are offering as a freebie
- Find freebie ideas on Pinterest
- Ask your audience through social media
- Ask people in a Facebook group
- Ask ChatGPT for some freebie ideas
Once you finalize an idea for your freebie, it’s time to design them. Make some notes and outline your freebie about what you want to include in it and how you want to design to be like.
To design your freebies, you can use a very easy to use graphic design tool Canva. I use Canva to design mostly everything you see on this blog. It’s a very easy to use and beginner friendly tool.
Some of the freebie ideas are:
- Checklists
- Templates
- WordBooks
- Cheat sheets
- Planner and schedulers
- Lists
Create your freebie and offer as much value as possible in it. Design a neat and beautiful looking graphics and download it once you are done. We’ll discuss further where you have to attach this freebie.
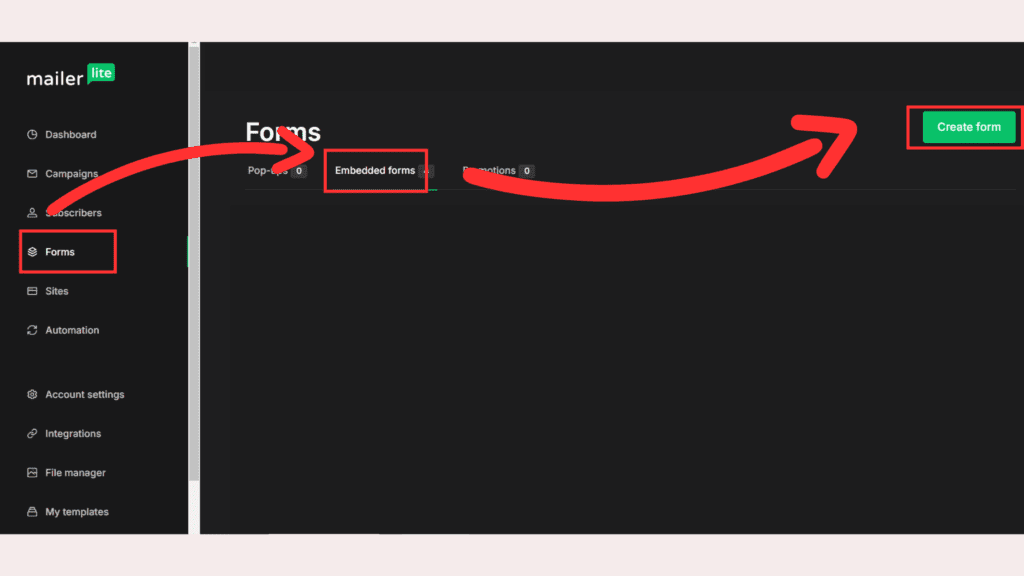
STEP 4: CREATE AN EMBEDDED FORM
Well done! You just successfully created your first ever freebie. Now it’s time to create a form for this opt-in and start building your email list.
To create a form, go to your MailerLite dashboard and go to forms < embedded forms < create form. Refer to this image ↓
Upon clicking on ‘create form’, give a name to your form (only visible to you) and choose the type of form (which is embedded form). Then click ‘save and continue’.
In the next window, you have to choose a subscriber group. You can divide your email subscribers into different groups to offer opt-tins to a specific audience group. Click on ‘add new group’ and give a name to that group and click continue.
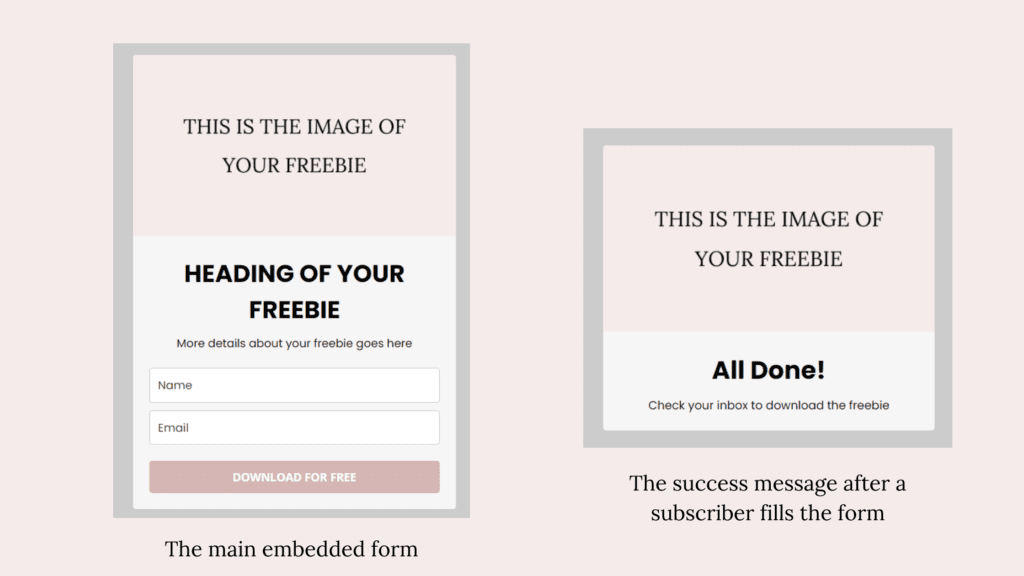
Upon choosing a group, you’ll be directed to a form editor. This is where you can customize your embedded form, add images to it, Add headings, change font and colors of the form etc. The size of the image you use in the form is recommended to be 2240 x 1260 pixels.
Take your time to create a good looking form and don’t forget to match it to your branding. Here’s a demo of the form design ↓
After completing the design of your form, click on ‘done editing’ on the top right and you’ll be directed to the overview page of the form.
DO NOT FORGET TO TURN ON THE DOUBLE OPT-IN OPTION HERE
Double opt-in adds an extra email confirmation step to your subscribers to avoid spams. It is always recommended to turn on the double opt-in option while building an email list.
In MailerLite, you can also edit your double opt-in email according to your site’s branding!
We’ll discuss further on where you have to attach your freebie.
Now you are done with the design of your form. it’s time to embed it to your blog posts and pages. To do that, go to the overview of your freebie form and scroll down. Copy the HTML code and paste it where you want on your site.
And that’s it!
Here is an embedded form which I created with MailerLite ↓
Looks pretty good, right?
Let’s move on to the next step!
STEP 5: ADD FREEBIE AND CREATE AUTOMATIONS
Here comes the most important step which is adding the freebie and creating automations for your group.
To create automations, go to forms < embedded forms < choose the form and click on overview < automations < create automation. You’ll be directed to an automation set up for that form.
To trigger the automation process, choose the ‘when subscriber completes a form’ option. Whenever a subscriber fills the form, they’ll receive a email in their inbox with a link to the freebie.
Don’t forget to add a 1 minute delay in the automation otherwise your subscribers will receive the subscription confirmation email and the freebie email both at the same time.
After adding the delay, this is what to do next:
In the automation workflow, click on the plus icon and choose the ’email’ option. Upon clicking the email option, fill up the details of the email like Subject, sender email, Name of the sender and then click ‘design email’ (on the right menu).
This will open a drag and drop email editor and then you can design your email however you like. Add your logo, the heading, the body text and then a button which includes a link to your freebie.
After you download your freebie from Canva, you can upload it third party tools like Google drive, drop box or your WordPress dashboard media. Add the freebie link in the button inside the email.
After you are done editing the email content, click on save and your workflow will look something like this ↓

And there you go! You just created your first ever form and automation successfully!
Here’s what to do next.
STEP 6: SEND WEEKLY EMAILS
Now the last but definitely not the least step – Send emails every week.
If not every week then send them regularly from time to time.
To send emails to your each subscriber, go to campaign and create your first campaign.
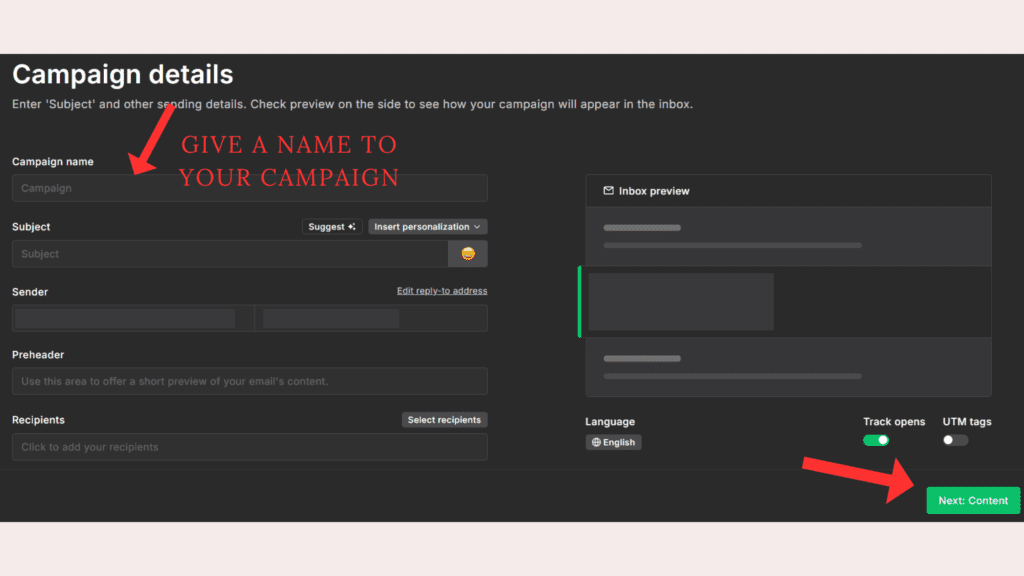
Give a name to your campaign such as ‘weekly newsletter’. Then for the recipients option, choose which group you want to send your emails to. You can also select all groups to send email to every subscriber.
After filling in the details click on ‘next: content’ and start designing your email.
Then you can send weekly emails to your subscribers. In the free version of MailerLite, you can send up to 12,000 emails in a month.
And that’s it for this tutorial. We just discussed the basics of this tool here. There’s much more you can do such as creating landing pages, A/B testing, see subscriber’ analytics etc.
But that would be out of the scope of this post.
Here are some Frequently asked questions about MailerLite and email marketing for blogging.
FREQUENTLY ASKED QUESTIONS
Here are some FAQ’s about email marketing for blogging ↓
IS MAILERLITE GOOD FOR BEGINNERS?
Yes! Absolutely! It is the most beginner friendly email marketing platform especially for bloggers and solopreneurs.
You can easily learn how to use it after signing up for it!
HOW LONG DOES IT TAKES TO BUILD AN EMAIL LIST?
This depends on a lot of factors. What is your niche? Which types of opt-ins are you offering? How many opt-ins you have now?
It takes up to roughly 100 views to a form to gain 1 email subscriber. So yes, it’s a long term game.
HOW OFTEN SHOULD I CREATE NEW FREEBIES?
You can create how many you want.
If you are just starting out then I recommend to create at least 1 freebie per month and be consistent.
WHERE SHOULD I PLACE MY OPT-IN FORMS?
Anywhere you want! You can embed your opt-in forms in between your blog posts, your freebie page etc.
Just make sure to maintain relevancy for better results.
DO YOU HAVE TO HAVE YOUR OWN DOMAIN TO BUILD AN EMAIL LIST?
Yes! Having your own domain is necessary to build an email list.
If you don’t have your own domain then you won’t have full control over things and that’s not what we want.
You can choose Bluehost as your hosting service if you want to start a blog in a budget.
Bookmark this post for later!