If you are not a techy person then it’s so easy to get intimidated by WordPress. I was like that too.
When I first started using WordPress, I was very very confused. I didn’t know what I was doing and I bet some of you also felt like that.
At that time, I was consuming any WordPress-related content I could to understand it as much as possible. But the content or posts I found online were too techy for me so it took me some time to get my way around WordPress.
This made me realize that there should be a guide available for those people who are not only beginners but also ‘non-techy beginners‘ just like I was.
So if you are one of those people and want to understand how to use WordPress then you are at the right place for that.
This is a step-by-step and very detailed guide to WordPress for you.
Please note that this is not a ‘how to build a website using WordPress tutorial‘. This is just a guide on how to use WordPress to know your way around it.
Let’s start, shall we?
Some links in this post are affiliate links. If you purchase through these links, I earn a commission at no extra cost to you. I only recommend products, tools and services that I trust. For more information, read the full disclosure here.
- SOME REASONS TO USE WORDPRESS IN 2024
- HOW TO USE WORDPRESS: A COMPLETE GUIDE
- 1- GET A DOMAIN NAME AND INSTALL WORDPRESS
- 2- LOG IN TO YOUR WORDPRESS DASHBOARD
- 3- SAVE IMPORTANT SETTINGS
- 4- HOW TO ADD A PAGE
- 5- THEMES ON WORDPRESS FOR YOUR SITE
- 6- HOW TO ADD A POST/BLOG POST
- 7- HOW TO ADD TAGS AND CATEGORY TO YOUR BLOG POSTS
- 8- HOW TO ADD A MENU FOR YOUR WEBSITE
- 9- WORDPRESS PLUGINS
- 10- WORDPRESS CUSTOMIZER
- HOW TO USE WORDPRESS: FINAL THOUGHTS
SOME REASONS TO USE WORDPRESS IN 2024
You must be wondering why WordPress is so popular when it comes to starting your blog or building a website, right? Or why should you use it? Well, there are many reasons:
- There are thousands of themes and plugins available to customize the design of your website easily which suits your preferences.
- WordPress is designed to be SEO friendly which is important to bring traffic to your site.
- Anyone can use WordPress. Whether you are a small blogger or building a large e-commerce store, WordPress can help you with anything.
- Many WordPress themes are responsive, meaning they automatically adjust their layout according to the device used which increases engagement.
- WordPress can transform into a powerful e-commerce platform, enabling you to sell products and services online with ease.
- WordPress is free to use. The only expenses are the hosting and domain of your site. It offers many free plugins and themes too.
There are more reasons but this post isn’t about that. I mentioned these reasons here to tell you that you can trust WordPress for your site.
Moving on to the main topic, let’s discuss everything about WordPress step-by-step below!
> Related: 200+ Blog ideas to write about
HOW TO USE WORDPRESS: A COMPLETE GUIDE
Let’s start with a little introduction of WordPress:
WordPress is a very popular and widely used Content management system (CMS) that controls hundreds, thousands, and millions of websites across the world.
It was launched in 2003 as a blogging platform and now has evolved into a huge CMS that can run any type of website blogging, business, or e-commerce.
Okay, now we have a little knowledge about what WordPress is so let’s understand how to use it easily for non-techy individuals. The very first step is to:
1- GET A DOMAIN NAME AND INSTALL WORDPRESS
A domain name is simply the name of your website. For example: [yourdomainname.com]
If you are a blogger, the very first step is to choose a good niche for your site. Once you have done that, the next step is to find a good name for your site.
If you are having difficulty choosing a good name then you can get some help from this tool called Namelix. Many bloggers also use their name as their domain name. For example: Margaretbourne.com.
Choose a good name that matches your niche, is easy to remember, and is not too long.
Every website has a unique domain name so you have to make sure that the name you have chosen is not taken by anyone else. To check the availability of your domain name, you can use Godaddy by entering the chosen name.
There! You now have a domain name for your site!
Pro Tip –
Use .com with your domain name as it is the most popular domain extension and stands for commercial.
But we are not done yet! You also have to claim that domain name to make it completely yours. You need to understand this first:
For your website, you’ll need two things: Hosting and a domain.
The hosting is basically where all the data of your website such as images, HTML documents, videos, etc. is stored. Good hosting services.
Hostinger is an affordable hosting service perfect for beginner bloggers.
I also have a full tutorial on how to start a blog for beginners using Hostinger. You can check it out too!
Now, the next step is to install WordPress:
It’s easy! These hosting services will make it easy for you. All you have to do is click once to install WordPress whenever they ask you to install it.
I have explained this in detail in the ‘Start a blog’ tutorial mentioned above. Take a look at it to find out!
Okay! We are completely done here! Let’s move on to the next step.
2- LOG IN TO YOUR WORDPRESS DASHBOARD
After completing the purchase of the hosting for your site, you also have to fill in some information and details.
One of the information they’ll ask you to fill up is the Username or Password for your WordPress dashboard. You have to be careful while choosing a Username and a Password.
Here are some things to keep in mind while choosing a username and password for your WordPress dashboard:
- Avoid common usernames such as ‘admin’ or ‘administrator‘. They are easy to guess and can increase the risk of hacking.
- Choose a username that is not associated with your actual name or your business name.
- Your password should be long, complex, and unique. Don’t use simple passwords like ‘password123‘ or ‘admin123‘. Use Uppercase and lowercase letters, numbers, and special characters.
- Regularly update passwords and install plugins to add an extra layer of security.
Don’t lose your Password as this is the only way to access the backend of your website. And if you are wondering- yes, you change your WordPress login password at any time. It’s not permanent.
To log into your WordPress dashboard, the most simple way is to go to your browser and enter this:
yourdomainname.com/wp-admin
You’ll see something like this:
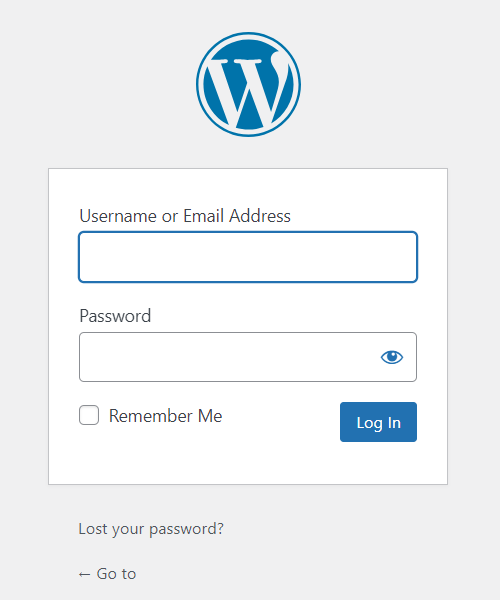
Just enter your Username and Password and click log in. The WordPress dashboard looks like this:
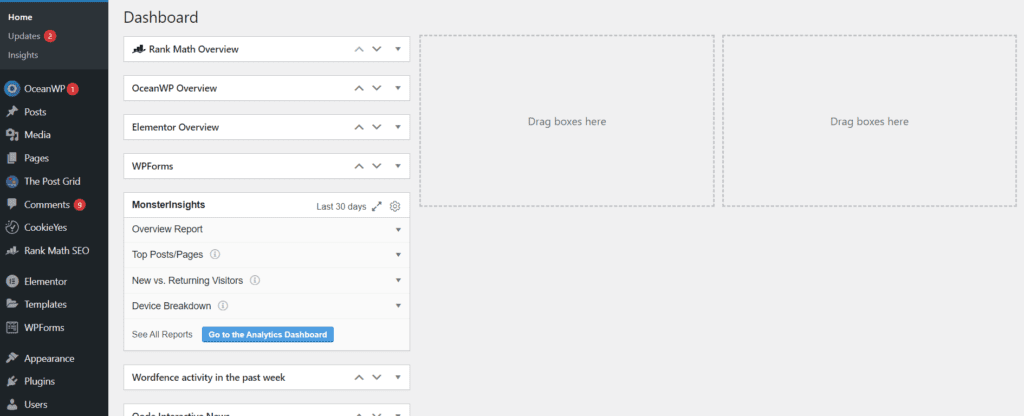
Great! You are in! Don’t get overwhelmed by this, follow along!
The black left panel has all the important things. Let’s understand them one by one:
- Posts: This is where all blog posts on your site are stored.
- Media: This is where all images or documents of your site are stored.
- Pages: This is where all the different pages of your site are stored.
- Comments: This is where all comments of your blog posts or pingbacks of your links are displayed.
- Appearance: This option allows you to customize the layout and design of your site.
- Plugins: WordPress offers many free and paid plugins to make things easier for you.
- Settings: You can control all the settings here such as date, time, language, and much more.
I’ll discuss all these options in more depth as we go further. Let’s carry on!
> Related: 15 Best WordPress themes for bloggers
3- SAVE IMPORTANT SETTINGS
Before we move on, there are some important settings you need to save in WordPress.
On the left side panel of the dashboard, you’ll see the ‘Settings’ option. If you hover on it, you’ll see these options:
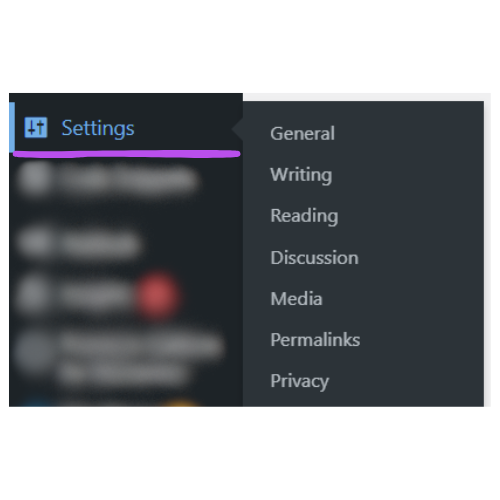
You don’t have to make changes in every single setting. Just only these:
Click on Settings > General and:
- Change the title of your website. You can enter related keywords here
- Enter a little description and include the keyword here too
- Make sure the URL of your website has your domain name in it
- Change the time zone according to your location
- Choose how the date and time are displayed on your website
Now Click on Settings > Writing and:
- Choose a default post category for your new post (which is ‘blog’)
- Set the default format of your blog posts (which is ‘standard’)
Next, Click on Settings > Reading and:
- In the ‘Your homepage displays‘ option, choose ‘A static page‘ and choose the page for your home page and your blog page. For this you’ll need to create the home page and blog page first so scroll down further to find out how to create a new page.
- Choose the number of blog posts displayed per page.
- In the ‘Search Engine visibility‘ option, make sure that the ‘Discourage search engines from indexing this site‘ option is unticked.
Next, Click on Settings > Discussions and:
- In the ‘Default post settings‘ option, make sure the first two options are ticked and the third option to allow or disable comments on blog posts is your choice.
- In the ‘Before a comment appears‘ option, make sure to tick the ‘Comment must be manually approved‘ option.
There are so many other options in this setting so you can choose yourself what you want to do. I just mentioned the most important ones here.
Lastly, Click on Settings > Permalinks and:
- In the ‘Permalink structure‘ option, choose the ‘Post name‘ option to make your blog links beautiful and non-suspicious.
And that’s it! These were the most important WordPress settings for your site.
4- HOW TO ADD A PAGE
On the WordPress dashboard, in the left panel, you’ll see a ‘Pages’ option. If you hover on it, you’ll see these options:
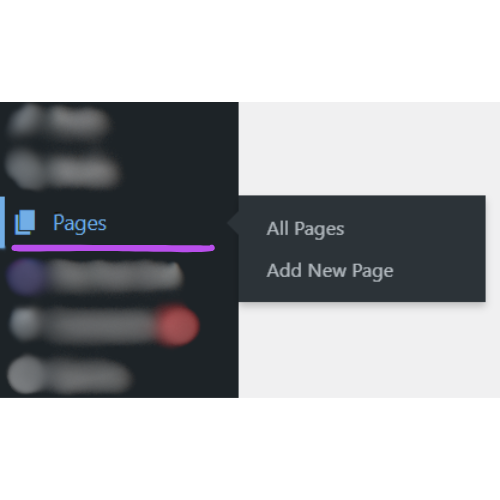
Here, you can see two options: All Pages and Add a new page.
In the ‘All pages’ option, you’ll see all the pages created on your site if you have already created them. If you have not created a single page, this is how you can create one:
If you have a new site, then these 6 pages are must to create:
- Home Page
- Blog page
- About page
- Contact page
- Terms of service page
- Privacy policy page
To create a new page, go to Pages > Add New Page and you are done but not quite!
Give a name to your page like this and click on publish on the top bar (twice) 👇
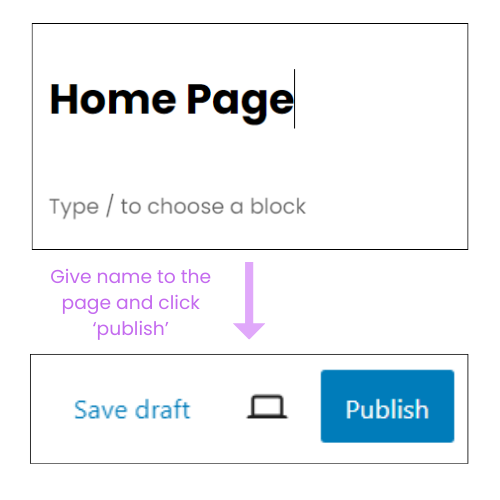
And here you go! You have successfully created your first page. Repeat the same process for the other 5 pages.
5- THEMES ON WORDPRESS FOR YOUR SITE
For the layout and design of your site, you need a theme for it. WordPress has many free as well as paid themes available.
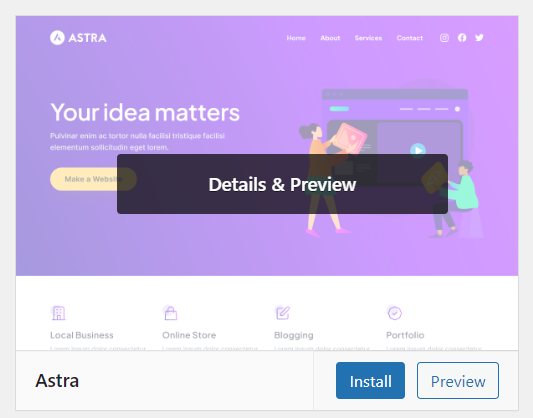
To access the theme library, go to Appearance > Themes on your dashboard. Here are the most popular WordPress themes that you can use for your site:
You can check out this post on the best WordPress themes for bloggers.
While choosing a theme, you need to make sure that the theme suits your niche, is fast, can be optimized for SEO, is trusted, is good, neat looking, and secure.
Once you have selected the theme, click on ‘install’ and then click ‘activate‘ to use the theme.
6- HOW TO ADD A POST/BLOG POST
Whether you have a blogging website, a business website, or an e-commerce website, creating blog posts is a mandatory step to grow a site. Your site can’t live without blog posts.
On the WordPress dashboard, in the left panel, you’ll see a ‘Posts’ option. If you hover on it, you’ll see these options:
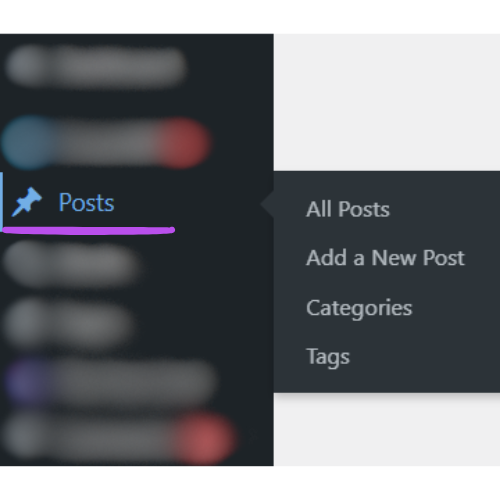
To create a new post, go to Posts > Add a new Post. Give it a title and start writing your blog post. Writing a blog post requires some research and strategy so I recommend taking some help from this blog post ↓
> Related: How to Write a Blog Post which people will read
After you are done, click on ‘publish’ (twice) to upload your blog post to your website. Simple!
7- HOW TO ADD TAGS AND CATEGORY TO YOUR BLOG POSTS
Giving tags and categorizing your blog posts is good for easy navigation and SEO purposes. Here’s how to do it:
On your WordPress dashboard, go to Posts > Categories from the left panel. You’ll see something like this:
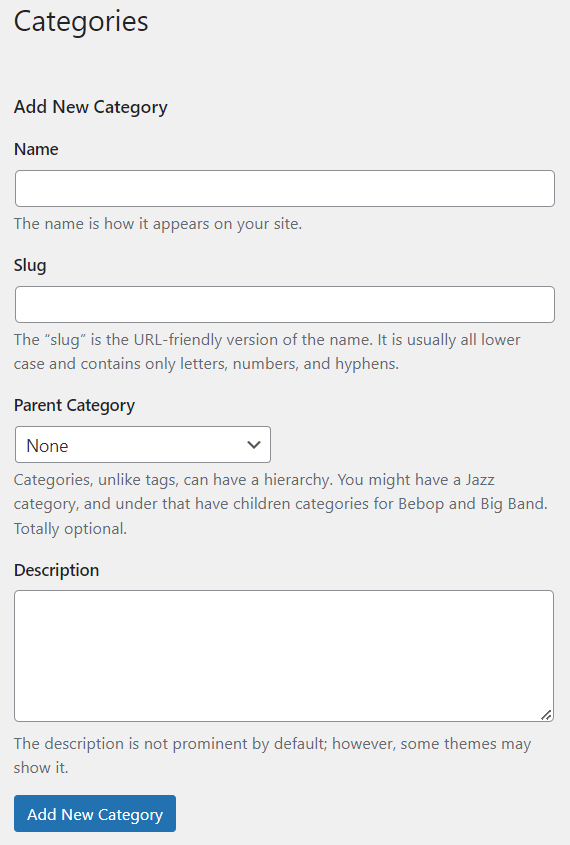
To add a new category, give a name to it (such as ‘blogging tips’) in the ‘Name‘ option. In the ‘Slug‘ option, enter the name of the category again and enter a little description of the category. Now click on ‘Add new category‘ and you are done!
Now comes the tags of the blog posts. There are two ways to do it but I’ll tell you the simple one:
Go to ‘Posts’ and click on any blog post. You’ll be directed to the WordPress editor of the blog post. Now:
- Click on the ‘Post’ option in the right panel and scroll down.
- You’ll see a ‘Tags’ option and an empty box of ‘add the new tag‘.
- Enter the tags of that blog post. Use keywords in that tag as it is an important place to use keywords in your blog post.
Well done! Now let’s move on to the next step!
8- HOW TO ADD A MENU FOR YOUR WEBSITE
A menu is where you lead a reader or customer to the other pages of your site. Menus can be added to the header and footer of the website.
To add a menu, you need to create the necessary pages first which I have mentioned above.
Here’s how to add a menu in WordPress:
- Go to Appearance > Menus and click on ‘Create new menu‘ at the top.
- Enter the name of the menu. The name won’t be visible on the site, it’s just to differentiate between other menus of your site.
- Click on ‘Create Menu‘ and you are done.
Now, we need to add pages to the menu. Tick the pages which you want to add to the menu and click ‘Add to menu‘. Like this:
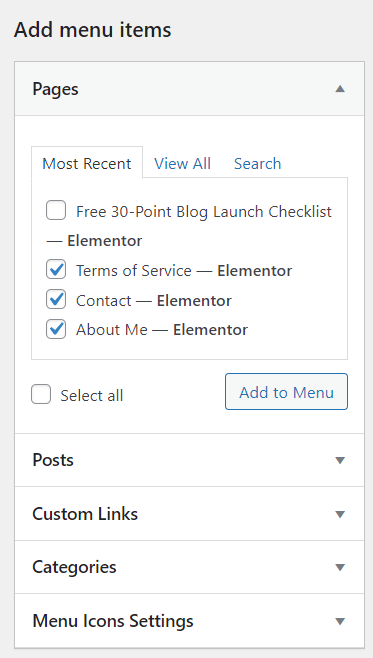
And there! You’ve created a new menu. You can repeat the process if you want to create a different menu.
9- WORDPRESS PLUGINS
WordPress plugins are probably one of the best features of WordPress (according to me).
There is a plugin for everything!
Do you want to create a form? Install a plugin. Do you want to do SEO? There are many plugins for that. Do you want to add social share buttons to your blog posts? Of course, a plugin will do it for you!
Do you want a plugin, too? Here’s how to install them:
- On the dashboard, go to Plugins > Add a new plugin and search the name of the plugin in the search bar.
- Click on ‘install’ and then ‘activate’ to use the plugin. Like this:
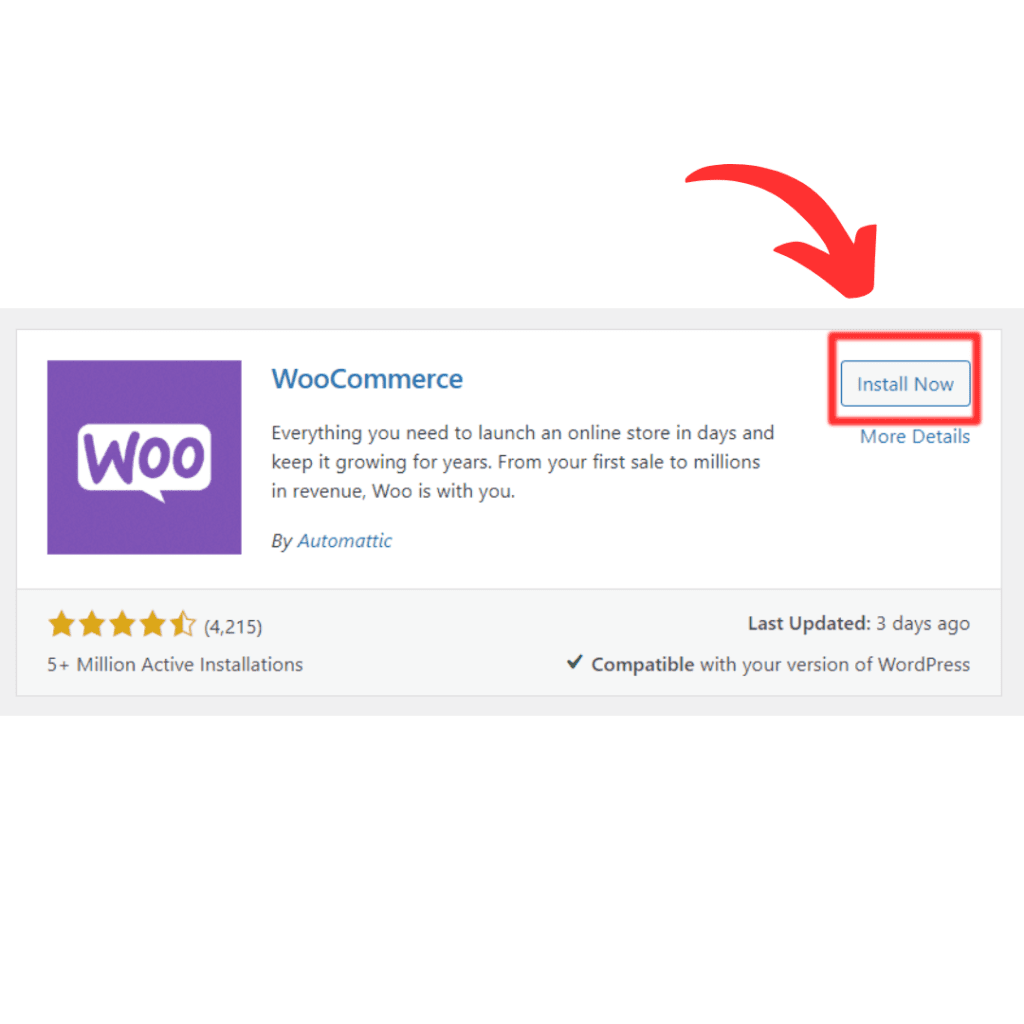
It’s easy to install, isn’t it?
Plugins are available in both free and paid versions and make sure that the plugin you are installing is trusted and secure to avoid the risk of hacking.
> Related: 15 Must-Have WordPress Plugins for Bloggers and Beginners
10- WORDPRESS CUSTOMIZER
Many website owners build their websites using famous page builders such as Elementor or Divi. If you don’t want to use these builders then WordPress has its customizer to design the layout of your site.
If you go to Appearance > Customise, then you’ll see the basic WordPress customizer. It looks something like this:
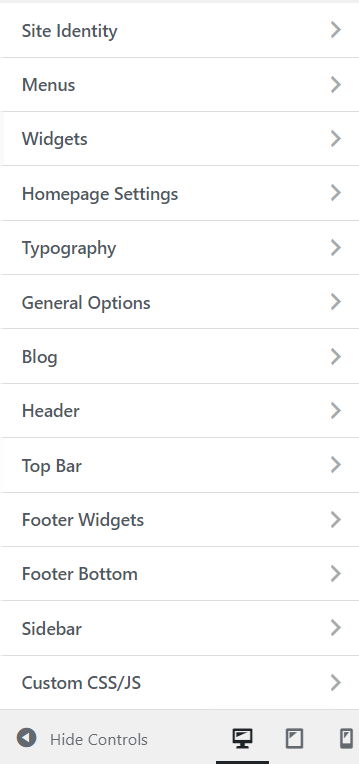
Some options may differ based on the theme you are using in this customizer.
You can customize stuff like the site icon (called favicon), the layout of blog posts, the header and footer, the sidebar, etc.
Please note that it’ll take some time to know your way around this customer. You’ll have to spend some time here and play around with different options to get better.
And that’s it!
HOW TO USE WORDPRESS: FINAL THOUGHTS
These are some of the most important things you must know about WordPress. A question for you:
When and how did you first hear about WordPress?
It’s not that difficult to use WordPress once you get to know a little bit about it. Don’t get intimidated by it, give it a try and you’ll get the hang of it.
WordPress has so many features, even for free, and that’s why people prefer it so much. You can control your site however you want because it’s self-hosted. Isn’t it amazing?
Also, make sure to pin this post so that you can come back to it later ↓

![Read more about the article 50+ Success Quotes for Bloggers and Entrepreneurs [2024]](https://markethio.com/wp-content/uploads/2024/04/Success-quotes-banner-300x150.png)


Thanks for this guide, it’s really helpful for beginner like me.
Your most welcome, Whitney!
I wish I would have had this list when I started my blog. Great job!
Thanks a lot, Gina!
SO comprehensive. I have been using wordpress for quite sometime and am happy with it.
Thanks, Vaishali!
I used to be intimidated by WordPress too, but this guide made it all so easy to understand! If you’re a beginner or not so tech-savvy like me, this step-by-step tutorial is a lifesaver. Can’t wait to start building my website with confidence!
Thanks for your kind words, Elizabeth!
This is the exact, fool-proof, WordPress guide I needed when I launched my blog. Great article that is going to help so many people!
Thanks! I am so glad to hear that!
You are my favorite blog for blogging tips! I think your website is so underrated. It’s SO helpful, thorough and clean.
Thanks a lot, Nicole!
Another great blog post. I really enjoy reading your blog.
Thank you so much!
such a great guide and explains every section so well.
Thanks, Tianna!