So you want to start your blog or maybe you are thinking about starting one.
Great!
Because this post contains everything you need to know about blogging and how to start a blog. From scratch! A to Z!

But here’s the thing….
You’ll need to invest a little bit to start a blog. If you want to create a profitable business out of it then you have to invest.
Yes, you can start a free blog. There are many platforms for that. But if you want financial freedom then I definitely recommend you invest a small amount of money and start a self-owned blog.
You’ll need a lot of tools to start a blog and that’s where you’ll need to invest but DON’T WORRY! I’ll recommend only those tools here that can fit into your budget.
Along with some tools, you’ll also need to learn how to promote your blog strategically and how to build an online community.
CHECK OUT THE BLOGGING TOOLS & RESOURCES LIBRARY HERE
I’ll discuss everything here. I GOT YOU!
I also need you to know that:
Blogging is just not writing articles. There are many things which come under it:
- Researching your audience
- Finding a niche
- Buying Hosting and Domain
- Branding your blog
- Designing a website
- Promoting on social media
And there are many other little works too.
I know this sounds pretty technical BUT TRUST ME. I created this post keeping everything in mind and I have explained everything here in a less complex and non-techy way.
There are many things I have realized after starting a blog and I have also made a lot of mistakes too.
But the good thing about blogging is that there is always room for growth. You own your blog and you can make any changes whenever you want to.
And that’s why this post is beginner-friendly, easy to follow, non-techy, and explains everything about blogging in general.
With that being said, let’s start with some basic concepts of blogging.
Let’s dive in, shall we?

Some links in this post are affiliate links. If you purchase through these links, I earn a commission at no extra cost to you. I only recommend products, tools and services that I trust. For more information, read the full disclosure here.
- WHAT IS BLOGGING?
- WHY YOU SHOULD START A BLOG (IN 2024)?
- THINGS TO KEEP IN MIND BEFORE STARTING A BLOG
- HOW TO START A BLOG IN 12 EASY STEPS
- STEP 1: CHOOSE A NICHE
- STEP 2: DO SOME RESEARCH
- STEP 3: CHOOSE A DOMAIN NAME
- STEP 4: CHOOSE A HOSTING SERVICE
- STEP 5: BUY DOMAIN AND HOSTING
- STEP 6: INSTALL WORDPRESS
- STEP 7: INSTALL A THEME
- STEP 8: INSTALL ESSENTIAL PLUGINS
- STEP 9: CREATE ESSENTIAL PAGES AND A MAIN MENU
- STEP 10: SAVE BASIC SETTINGS FOR SITE & DESIGN WEBSITE
- STEP 11: CREATE YOUR FIRST BLOG POST
- STEP 12: PROMOTE YOUR BLOG
- HOW TO START A BLOG: SOME FAQS
WHAT IS BLOGGING?
The meaning of blogging has changed over the years. The meaning of the term ‘blogging’ is not the same as it was 10 years ago.
How?….
You see, almost 10 years ago, if you asked someone what do they understand by blogging, they’d probably say something like- sharing your daily life with people on the internet.
And yes, that is true. Blogging originated with this meaning.
But, it’s not like that anymore.
Nowadays, blogging is more like an online business. Your goal with your blog is to help people with their problems and build an audience to earn income online.
So in simple terms, blogging means writing and publishing articles or creating any type of content on your website.
> Read more: 10 free ways to promote your blog and bring traffic
WHY YOU SHOULD START A BLOG (IN 2024)?
Now, you may be wondering, ‘Should I start a blog?’ or ‘Is it a good time to start a blog?’.
Well, let me tell you 4 biggest reasons why you should start a blog in the big year of 2024:
1- PASSIVE SOURCE OF INCOME
Blogging is a good source of income. And yes, you can 100% make money through blogging. The good thing about blogging is that there are multiple ways through which you can make money.
Everyone’s dream is to live a financially free life and blogging can make it possible because it is a source of passive income.
2- ALWAYS ROOM FOR GROWTH
Anyone can start a blog. You don’t have to be an expert to run a blog and make money. That’s because blogging is a journey about learning and growing.
This is the best thing about it.
There’s always room for growth. You can make mistakes and learn from them. It’s a whole journey of knowledge and experiences.
3- YOU CAN BE YOUR OWN BOSS
You are the owner of your blog. You can control it however you want. You can work independently.
Sounds pretty good, right?
That’s the beauty of blogging. It requires a lot of hard work and grind but it’s all worth it in the end, trust me.
4- YOU’LL LEARN NEW SKILLS
Blogging is a learning arc, especially when you are completely new to it.
Once you own a website, there is so much you have to learn and apply to craft a satisfying blog. And this whole process teaches you a lot of new skills like designing a website, SEO, creating graphics, etc.
This is an advantage because it is always good to learn something new.
THINGS TO KEEP IN MIND BEFORE STARTING A BLOG
Before we move on to the actual steps, there are some things that you have to keep in mind before starting a blog.
Starting a blog becomes fairly easy if you keep these things in mind:
1- BLOGGING IS A LONG TERM GAME
You can’t expect to start a blog today and start earning a month later.
Let’s be realistic here…
One month is nothing. Google alone takes up to 6 months to completely index your site. Let alone earning full-time within 1 or even 3 months.
When you buy a domain and hosting (which we will discuss later), your site doesn’t exist yet. It’s a ghost among thousands of other sites.
So please keep working hard and be patient. Blogging won’t give you immediate results but it will after some time.
2- RIGHT MINDSET
Your mindset plays an important role in the success of your blog.
If you’ll have a positive mindset then you will definitely feel motivated to carry on with this biz.
Don’t let the negative thoughts surround your mind and keep working towards your goals. Set small, achievable goals to stay motivated and don’t give up.
One more thing, DON’T COMPARE YOURSELF TO OTHERS!
This is the worst thing you can do to demotivate yourself. Focus on yourself and your blog. BE YOURSELF.
3- YOU DON’T HAVE TO BE AN EXPERT
Just like I said before, anyone can start a blog. You don’t have to do a particular course or diploma to start a blog.
Just be yourself, write about the topic you like, GIVE INFORMATION TO PEOPLE and you can call yourself a blogger.
Start small, work hard and you’ll see the results.
4- READY TO LEARN
When you start a blog, you learn something new every day. Even I learn something new every two weeks.
You are a beginner in this field and you have to grow as the time passes by.
The reason why you want to start a blog is definitely because you want to be financially independent.
So if you want to achieve this freedom then always be willing to learn something new. From other fellow bloggers or experts, just make sure you are learning and gaining knowledge.
5- YOU CAN’T CREATE A BLOG IN 10/20 MINUTES
Whenever I search about how to start a blog, I keep seeing only one thing: ‘Create a blog in just 10 minutes!’
But practically, it’s impossible to do that.
The only thing you gonna do in 10 minutes is learn how to install a plugin. Let alone creating a whole blog!
So just want to let you know that it’s not possible to create a blog in 10 minutes. It will take up to 5 to 10 days to understand everything about blogging and creating a blog. Sometimes more than that.
Don’t trust on clickbait stuff.
> Read more: 10 free SEO tools for new bloggers
HOW TO START A BLOG IN 12 EASY STEPS
Now comes the main topic of this whole post. I have explained everything here about how to start a blog and which are the best tools you’ll need.
I recommend to grab a notepad and write those things which seem important to you. I, also, have highlighted the important points for you to note down.
Here’s the very first step:
STEP 1: CHOOSE A NICHE
This is the first and the most important step. Choose a niche for your blog.
A niche is the main subject of all your blog topics. It is the topic of your whole website and its content.
For example: Parenting, food, travel, self-care, and skin care are a niche.
Blog niche can be:
- Broad niches: Like the above examples of parenting, food, travel, etc. which covers a very broad topic.
- Micro niches: which cover small topics for example- instead of writing about traveling the whole world, you can focus on one country only in your blog. That is called micro niche which focuses on small topics.
You can check out this post by me where I discussed more than 130 Blog Niche Ideas to start a blog.
But here are some popular blog niche ideas for you:
1- Personal Finance
2- Health and Wellness
3- Travel
4- Parenting
5- Technology
6- Personal development
7- Self-care
8- Skin Care
9- Food and Cooking
To help you more with choosing your blog niche, I recommend keeping in mind the following things:
- Before choosing a niche, ask yourself if you are genuinely interested in that topic or not. Are you willing to learn more about that topic in the future? Does that topic excite you? Take the time to figure out and choose accordingly.
If you are passionate and curious about the niche then you’ll stay more motivated to create content. - Make sure you are choosing that niche in which you have a little bit of expertise. And if you don’t have the expertise then try to gain it. Learn about it. And then create content in your own way.
The more you research, the easier it gets to choose a niche. We’ll discuss more about researching further.
STEP 2: DO SOME RESEARCH
Before we move on to the buying and purchasing process, there are some important things you have to make sure before investing.
You now have a niche for your blog but you need to do some research about the niche too for the ‘final confirmation‘.
Perform a simple research about the following things:
- Research the demand of your niche. You can use some simple tools like Google Trends or any keyword research tool for that. Make sure that people are searching about the topics you are going to write on your site.
- Find your target audience. Which country do you want to focus on, find out who they are, what are their problems and needs, what are their interests, etc. This way you’ll get a rough idea about your content and audience.
- Plan out how to stand out. If you are going to blog on a competitive niche then find out how you can create unique and stand-out content. Find out which points other bloggers are missing so that you can create content out of it.
- Set goals. Ask yourself if your niche aligns with the goal you had in your mind when you started to think about starting a blog. If creating a brand is your goal, is your niche good for it?
- Make sure there is enough content to write about. If you are done with choosing a niche then your next step is to research the amount of content you can create out of it.
The points I have mentioned above require some simple research.
To find some fellow bloggers, you can go to Pinterest and search your niche. You’ll find a lot of bloggers there within your niche and you can take some inspiration from them.
To find your target audience, you can simply search on Google and find out what people in the chosen niche are searching for.
Take your time researching the niche and then make the final decision.
STEP 3: CHOOSE A DOMAIN NAME
Did you choose your blog niche yet? If yes, then great!
Because now we are going to give your blog a name. Choosing a name is a very important step so just follow along to make sure you don’t make any mistakes.
First of all, let’s discuss what exactly is a domain name.
A domain name is the name of your website. For example: [domainname.com]
You can brainstorm some domain names for your blog and then check if they are available or not on Godaddy.
If you are having trouble finding some good names then you can also take the help of this tool called Namelix which recommends you some amazing domain names according to your niche.
Here are things you have to keep in mind while finding a domain name for your blog:
- Make sure the name aligns with your blog niche to create a branding of your blog.
- Make sure the domain name is not more than 2 or 3 words to make it memorable. This way people won’t have much difficulty in finding your site.
- Don’t use numbers, special characters, hyphens, etc. in your domain name. This makes them more complex.
- If possible include keywords related to your niche to make it more SEO-friendly.
- The .com extension is the most popular and widely recognized. If it’s not available, consider other well-known extensions like .net, .org, .co, etc.
- Avoid double letters such as geniusstats.com. This leads to typos.
And that’s it!
Take your time to find a good domain name for your blog.
STEP 4: CHOOSE A HOSTING SERVICE
For a website, you need two things: a domain and a hosting.
After choosing a domain name, there are two ways through which you can buy a domain for your site.
1- Through a third-party tool like Namecheap you can purchase a domain immediately after deciding on a domain name for your blog.
2- Through a hosting service where you can buy both domain and hosting altogether.
For this tutorial, I’ll be discussing the second way because it’s much easier and hassle-free. Just follow along!
Before we move further, let’s discuss what is hosting.
In simple terms, web hosting is a service that stores all the data related to your website such as HTML documents, images, videos, and other stuff.
There are many good hosting services available for you to get started but in this tutorial, I’ll discuss how you can set up your blog using Hostinger as I completely trust in it. My blog Markethio is also hosted by Hostinger!
‘But why Hostinger?’ There are many good reasons for you to use Hostinger as your hosting provider:
1- It’s reliable and affordable (starts from $2.9 per month)
2- Very Simple to set up and use
3- 24/7 Customer support (which is great!)
4- Great for bloggers
5- Free Business email
6- Security
7- Fast loading website
8- Free SSL certificate
9- One-click WordPress installation
And there are many more features! So, I 100% recommend you to go with Hostinger as your hosting provider.
STEP 5: BUY DOMAIN AND HOSTING
So far we have a domain name and a hosting service. Good Job!
Now the next step is to purchase a domain and hosting. This is it! The moment you purchase that hosting and domain, you are in for an adventurous journey.
Let’s begin!
You’ll be directed to the home screen of the Hostinger website. Scroll down and choose the suitable plan for your site. I recommend going with the premium plan as it offers everything you’ll ever need to set up your blog. Refer to this image ↓

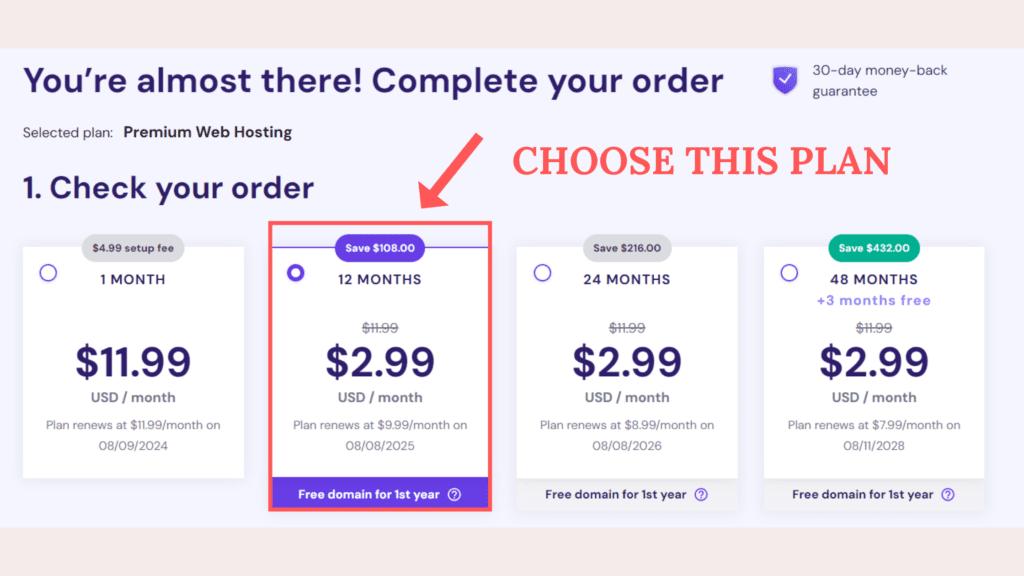
Click on ‘Choose Plan’ and then you’ll be directed to this page ↓ The pricing plan shown here lets you choose the length of the hosting plan. I recommend going with the 1-year plan here. You also get a free domain for the first year. Rest is totally your choice.
Then proceed with the following steps ↓

After completing the payment, Hostinger will ask you to reset your Password to access your Hostinger Dashboard. After resetting your password, you’ll be directed to your Hostinger dashboard which is called ‘H-panel’.
Remember earlier when you chose a domain name for your blog on GoDaddy? Yes! It’s time to claim it yours! To do that, go to your h-panel and then click on ‘claim domain’.

Upon clicking ‘claim domain’, you’ll see this interface ↓ Enter your domain name here without spaces and choose the extension as .com.

If the domain name is available then Hostinger will show you a message that the domain name is available. Then you can go ahead and click on ‘claim domain’. Upon clicking ‘claim domain’ you’ll have to fill up some info to complete the process.

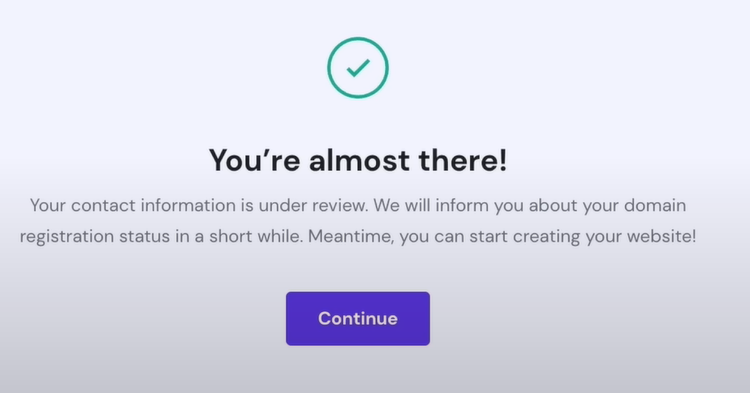
After filling up all the details, you’ll get the following success message ↓
Great job! You did it!
Now the only thing left to do is install WordPress which only takes a single click to do.
Follow the next step!
STEP 6: INSTALL WORDPRESS
WordPress installation is so simple and completely free to do. You only need to do one click for that.
After completing the above steps, log in to your h-panel and click on ‘Setup’ as shown in the image below. Then enter your WordPress dashboard login details. Choose a strong Username and password, then proceed further.

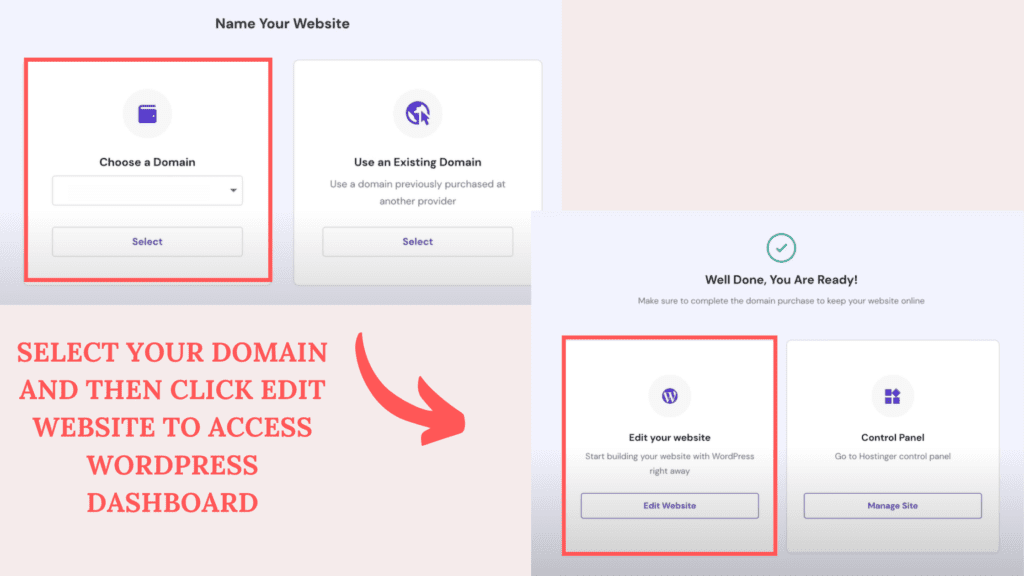
After entering the login credentials, you’ll see the following interface. Select your domain and then click ‘edit website’ to access your WordPress dashboard.
And there you go! You will now be directed to your WordPress dashboard in just some simple steps.
Tip: Bookmark the WordPress dashboard on your browser to access it easily and tick the ‘remember me’ option to avoid entering the login info again and again.
Hurray! You did it!
The WordPress dashboard looks like this ↓
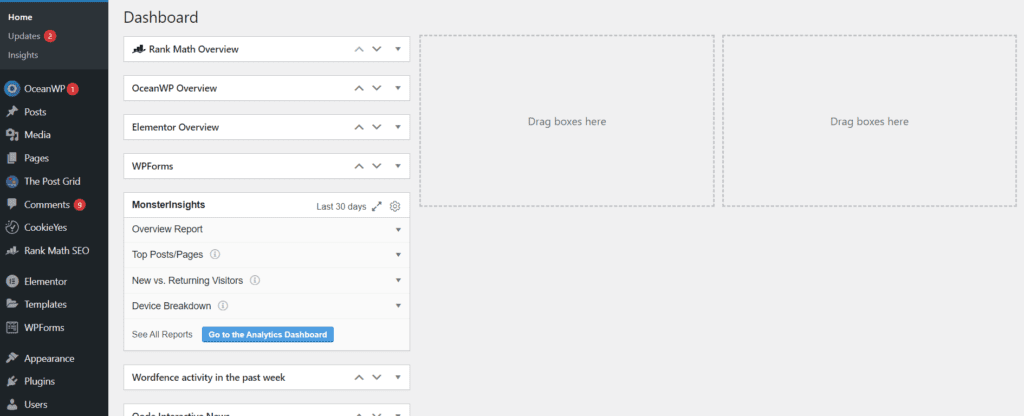
I know it looks a little bit intimidating BUT just follow this tutorial and leave everything to me.
Before we move on, let’s understand what is WordPress.
To put it in simple words, WordPress helps you to build or create your site/blog.
It is the most popular platform to build your website without the requirement of any coding skills. It requires some tech know-how but it is pretty simple to understand.
WordPress is available in two types: WordPress.com and WordPress.org. You can learn the difference between both of these in this post about WordPress.com vs WordPress.org.
Play around for some time and familiarize yourself with the platform.
The navigation menu on the left side of the dashboard is where you’ll be able to create things.
Let’s take a deep look at the next step.
> Related: How to use WordPress for the first time ever
You can bookmark this post on Pinterest to come back later!

STEP 7: INSTALL A THEME
After logging in to your WordPress dashboard for the first time, the very first thing you have to do is install a theme for your site.
Your website is currently running on a default WordPress theme which looks so ugly. We don’t want that! Remove it! Throw it out the window!
Installing a pretty theme will give your website a beautiful look and structure.
Follow these steps to find a theme within WordPress:
1- On the left navigation menu, go to ‘Appearance’
2- And then go to ‘Themes’

Search for a theme of your choice in the search bar. Here are some of the best WordPress themes you can use for your blog:
1- Astra (freemium WordPress theme for any kind of website)
2- OceanWP (freemium WordPress theme, fast page loading)
3- Divi (paid theme with a visual website builder)
4- Bluchic themes (paid feminine WordPress theme)
5- Blossom themes (free and premium feminine WordPress themes)
I also have a post on the 15 Best WordPress themes for bloggers. You can check it out for more details.
You can choose any of the above themes but there are some things that I would recommend to keep in mind while choosing a good theme:
- Make sure the theme matches your blog niche. Preview the theme to see if the design and layout suit your niche or not.
- Make sure the theme is responsive on all devices.
- Make sure the theme has less loading speed to improve SEO.
- Make sure the theme looks neat and is easy to use.
- Make sure that the theme is compatible with WordPress plugins which we will discuss later.
Take your time and search for a good theme of your choice.
OK! Now it’s time to install the theme.
There are two types of themes: one which you can directly install from WordPress themes and the other one which you have to upload to WordPress.
To install a theme from WordPress, go to appearance → themes → search for the theme → hiver on the theme → click install → then activate.
Like this ↓
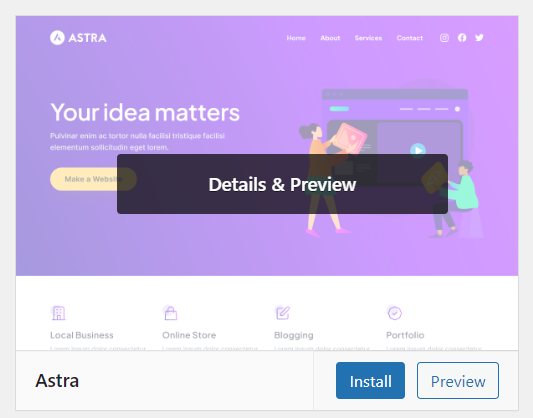
If you are using a third-party theme then go to Appearance → themes → add new → and upload theme.
And that’s it! You are done!
STEP 8: INSTALL ESSENTIAL PLUGINS
Now, you have a theme for your blog. Well done!
The next step is to install some WordPress plugins that will help you design your blog, run your website, write blog posts, etc.
To install a plugin, go to Plugins → Add new Plugin on the left navigation menu on the WordPress dashboard. In the search bar, enter the name of the plugin you want to install.
For starters, I recommend going for the free plugins only. WordPress offers plenty of free plugins. You can use the paid ones after some time when you see some growth in your blog.
Here is a list of plugins you must install:
1- Rankmath: Free SEO plugin for your blog
2- Elementor: Free drag-and-drop website builder
3- Smush: For compressing images
4- Monsterinsights: To see website analysis
5- Hubbub: To allow people to share your blog
These 5 plugins are a must for beginners. There are many more you can install later. Here is a complete list of the 10+ must-install WordPress plugins.
To use the Monsterinsights plugin, you’ll need to configure Google Analytics to track your website analytics.
STEP 9: CREATE ESSENTIAL PAGES AND A MAIN MENU
Before creating some pages, let’s understand what is a page on a website.
A page is a document that displays some information on any browser. This is a page of this website. Visit other posts, they are also pages of this website.
The menu you see at the very top of this site also contains pages. I think you now have some idea how pages work on a website.
There are 7 most important pages you must create for your blog:
1- Home Page
2- Blog Page
3- About Page
4- Contact Page
5- Privacy Policy
6- Terms of Service
7- Affiliate Disclosure
Let’s learn how to create a page.
On your WordPress dashboard, go to Pages → Add new Page → Give a title to the page (for exam- Home Page) → Click on Publish on the top navigation bar → Click once again to confirm publishing.
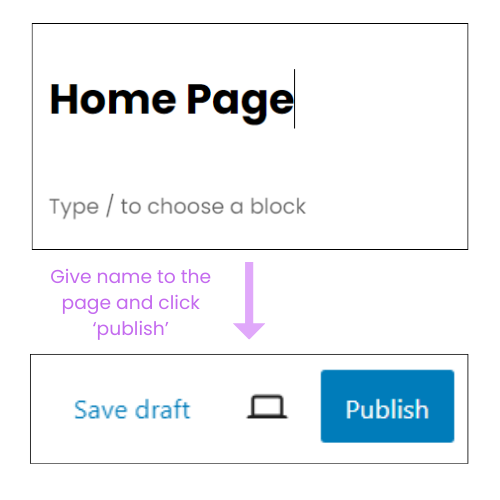
Repeat the same process for 6 other pages and you are done!
Let’s understand the description of these pages:
1- Home Page: A home page is the main page of your blog. A home page is where a visitor can navigate your whole website easily.
2- Blog Page: A blog page is where you upload and store all the blog posts of a website.
3- About Page: An about page is where visitors can learn more about the owner of the website. You can display your expertise and services on your About page.
4- Contact Page: A contact page is from where people can contact you through a form or your email in case of any queries or offers.
5- Privacy Policy: It is the first legal page for your site where you have to display the policies of visiting your site to visitors.
6- Terms of service: It is the second legal page of your site through which you have to display the terms and conditions of your website.
7- Affiliate disclosure: It is also a legal page where you have to display the affiliate disclosure of your website if you are earning through affiliate marketing.
To create the last three legal pages, you can use Termsfeed to generate the legal pages of your blog.
After creating these pages, you’ll need to create a menu for your site. Like the one you see on the very top of this site.
To create a menu, go to Appearance → Menus → Create new menu → Give a name to the menu → add all the pages you want to display on the main menu.
STEP 10: SAVE BASIC SETTINGS FOR SITE & DESIGN WEBSITE
Before you start designing your website, there are some essential settings you want to save for your blog.
On the left navigation menu of the dashboard, you’ll see the ‘Settings’ option. Click on it and make the following changes:
- Click on Settings → General and Change the title of your website as your blog name.
- Change the time zone according to your location and also Choose how the date and time are displayed on your website
- Click on Settings → Writing and Choose a default post category for your new post (which is ‘blog’).
- Click on Settings → Reading and in the ‘Search Engine visibility‘ option, make sure that the ‘Discourage search engines from indexing this site‘ option is unticked.
- Click on Settings → Permalinks and in the ‘Permalink structure‘ option, choose the ‘Post name‘ option to make the URLs of your site look beautiful.
After saving these settings, you can now go on and design your website.
If you don’t have the time and expertise to design a website then you can always hire a web designer to design your blog.
But if you want to design your site by yourself then you’ll need the Elementor plugin which I’ve also mentioned earlier. It is a free drag-and-drop website builder that requires no coding skills to design.
After installing the plugin, go to the page you want to design and click on the ‘Edit with Elementor’ button to start designing. Like this:
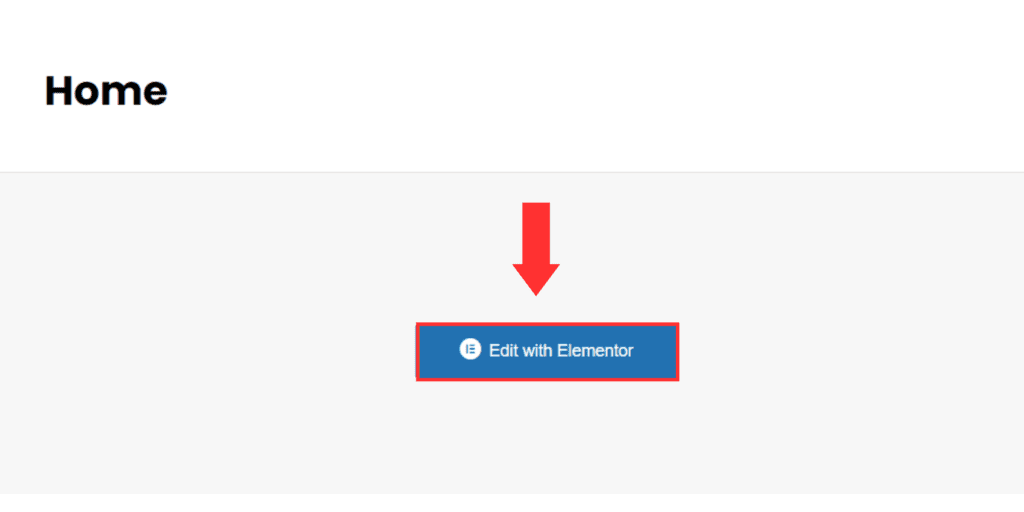
The best thing about Elementor is that there are plenty of tutorials available online that you can follow to design your blog. Just a simple Google search will give a solution to your problems.
Tip: Create a rough layout of your website on paper before start designing. That way you’ll get a rough idea of how you want your site to look. Pinterest is a great place to get inspiration too.
Take your time to choose the colors you want to use for the branding and keep researching for the solution.
STEP 11: CREATE YOUR FIRST BLOG POST
Alright! So far you’ve done a great job!
Now it’s time to create the most essential part of your website: A BLOG POST.
Before creating your first post, brainstorm some ideas you want to write about. Search on Google about those topics you want to write about and find out what people are looking for.
Many people also ask if they need to write an introduction post or not. The answer is NO. There is no need to write an introduction post. There are very few chances that you’ll get some views on your first post.
After you find the topic, the next step is to create the post.
To create a post, go to Posts → Add new post. Then give a title to your blog post and start writing the post. Like this ↓

Now this is your very first blog post. Don’t sweat it. While writing, just try to be yourself.
There are a lot of things you have to keep in mind while writing a blog post. For that, you can read this post about how to write a blog post.
You’ll also have to learn how to do SEO to make your posts visible on search engines like Google, Bing, etc.
For SEO, the Rankmath plugin is my top choice because it’s reliable and easy to use. It’s a free SEO plugin which I definitely recommend you to use if you are new to SEO.
You can read this post about how to do SEO for your blog post in 10 easy steps.
You can always come back and make changes to your blog post so don’t try to craft a ‘Perfect’ post.
Take it easy! It’s only your first post.
STEP 12: PROMOTE YOUR BLOG
Congratulations, you made it to the last step!
You have a designed website, you created your first blog post, you learned some SEO and now it’s time to bring some readers to your blog.
Let’s learn about different ways to bring some traffic to your site.
➤ Through Social media
Social media is one of the best ways to bring traffic to your blog. For starters, I recommend creating two social media accounts and focusing on them. Choose only those platforms that work the best for your niche.
Experiment with different content types, take inspiration from other bloggers, and post consistently to build an audience.
➤ Through Pinterest
Pinterest is a must for bloggers. You have to be on Pinterest to promote your blog if you are a beginner blogger. It is one of my biggest sources of traffic. I get thousands of page views using Pinterest.
Create pins about your blog posts and upload them on Pinterest with a link to the blog posts. After some time, you’ll see people visiting your blog.
Keep in mind that Pinterest is a long-term game and requires patience. So I recommend focusing on other platforms along with it.
➤ Through Email subscribers
Here’s a quick key takeaway: Build your email list from day one.
Building an email list is a must for bloggers because your email subscribers are considered as your ‘real followers’.
I use MailerLite to build my email list. It’s a free, easy-to-use, and awesome tool for beginner bloggers. I get great results from this tool.
To build your email list, you’ll need to offer freebies, courses, templates, checklists, cheatsheets, etc. which provide value to your readers.
➤ Through SEO
SEO is also a must for bloggers to get some organic traffic to your blog. You’ll have to make Google love your content to be able to bring some traffic to it.
I recommend reading this post about how to do SEO for your blog post.
SEO takes time but the results are so worth it.
Apart from all these promotion techniques, there are many other ways through which you’ll get traffic to your site. You can more about it in this post about how to promote your blog for free.
HOW TO START A BLOG: SOME FAQS
And that’s all! You’ve reached the end of this tutorial.
Please clap for yourself because you did a lot of work. (I am clapping for you too!)
You may have some questions because starting a blog means always getting surrounded by a lot of confusion and queries. Here are some commonly asked questions about blogging which I have answered for you.
➤ Should you start a blog in 2024?
The straightforward answer is YES.
It’s never too late to start a blog. There are approx. 8.5 Billion Google searches per day which means a lot of people still read blog posts.
As long as search engines and the internet exist, blogging exists too. Don’t regret not starting a blog earlier.
➤ Can you make money blogging?
Yes, it is possible to make money blogging. A lot of people start a blog with the aim of earning passive income online which is possible in the case of blogging.
As long as you have a self-hosted site by a good hosting service such as Hostinger, as I’ve discussed earlier, you can make money blogging.
Many bloggers make enough money to quit their 9 to 5 jobs and live a financially free life. Sounds like a dream, right?
You can achieve this dream too. Just blog strategically with a good plan and you got this.
➤ How and when should I post?
There’s no particular time and date to post a blog post. But make sure to post at least 1 post per week to maintain consistency.
I recommend creating a content calendar to keep everything organized and to follow a schedule. You can check out my free blogging tips + blogging Workbook for that.
➤ How do I find Blog ideas?
There are many ways to find good ideas for your blog posts. You can use Google Trends to find out what’s trending in your niche.
You can use Google’s autosuggest to find out blog topics and you can also do keyword research to find topics with high search volumes. Here are some of the best keyword research tools for you to check out.
Other than that, you can brainstorm ideas and find some unique topics too.
➤ How long does it take to start earning?
It depends.
Some bloggers start earning within 6 months and for some, it takes up to a year.
Earning depends on a lot of factors such as your niche, demand for your niche, traffic, monetization strategies, promotion strategies, etc.
There is no fixed answer for this question because like I said it depends on a lot of factors.
➤ Do I need to be an expert or tech-savvy?
No. You don’t need to be an expert or a techy person.
Even I am not that much of a techy person. English is not even my first language!
Yes, blogging is a learning experience but it’s not difficult. If you are scared to start a blog because you are not good with tech stuff then I need you to get that thought out of your mind.
Just start because you want to achieve something and go for it.
