
Bringing traffic to your blog is, may be, the hardest task of blogging out of anything.
It requires a lot of hard work, patience and a good strategy. Blog traffic is important for your blog in so many ways, but it’s difficult to get it.
If you haven’t started a blog yet then you can follow this beginner friendly, step by step start a blog tutorial to start your own self hosted blog.
But why exactly does blog traffic matter so much?
That’s because the number of page views determines your blogging success. More page views mean more opportunities and blog growth.
But the issue is….
Getting organic traffic from search engines takes a lot of time and patience. So, what exactly should you do in the meantime? You can’t just sit around, wait, and hope to get some organic traffic, right?
Well, that’s exactly where social media and Pinterest jumps to the rescue.
Did you know that Pinterest gets around 900+ Million monthly visitors in 2024. That’s a huge number!
Now your goal here is to bring some people from Pinterest to your website and in order to do that, you’ll need to do some Pinterest SEO.
I understand that if you are completely new to this, you may get a little bit confused here, but don’t worry. I am here to help!
I am creating this post especially for Pinterest focused traffic and how to optimize Pinterest profile to get some traffic. YES, IT IS POSSIBLE GET TRAFFIC FROM PINTEREST IN 2024!
Let’s not waste any more time and jump straight to the topic!
Some links in this post are affiliate links. If you purchase through these links, I earn a commission at no extra cost to you. I only recommend products, tools and services that I trust. For more information, read the full disclosure here.
- WHAT IS PINTEREST USED FOR?
- HOW TO USE PINTEREST FOR BLOGGING?
- HOW TO OPTIMIZE PINTEREST PROFILE: 9 EASY STEPS
- STEP 1: CREATE A BUSINESS ACCOUNT
- STEP 2: CLAIM YOUR WEBSITE
- STEP 3: SET UP YOUR PROFILE PICTURE
- STEP 4: SET YOUR NAME & DESCRIPTION AND USE KEYWORDS
- STEP 5: CREATE RELEVANT BOARDS
- STEP 6: ADD KEYWORDS TO BOARDS
- STEP 7: OPTIMIZE YOUR OWN PINS
- STEP 8: REPIN CONSISTENTLY TO BOARDS
- STEP 9: UPLOAD PINS REGULARLY
WHAT IS PINTEREST USED FOR?
Pinterest is a search engine, a visual search engine to be more exact. Many people think that it is a social media platform but no, it’s not.
That’s because this platform works like a search engine and utilizes a search engine algorithm. Pinterest posts are called ‘pins’.
Just like you optimize your blog posts and website for Google ranking, you have to optimize your Pinterest profile and pins too for better reach and visibility on Pinterest.
To be honest, when I was a complete newbie to the blogging world, I didn’t even know that you can use Pinterest to bring traffic to your blog. I was so thrilled when I found out you can use this platform to grow blog traffic.
And after that, I spent endless hours researching about how Pinterest works and how to use it for blog traffic.
It’s been months since I first started using Pinterest and now I get thousands of page views just from Pinterest alone.
So yeah, Pinterest traffic is not a myth. It is 100% possible to get traffic from it. You just need to follow the right strategies.
My recommendation is to maintain consistency and have patience. Pinterest is a long term game.
Just follow along!
HOW TO USE PINTEREST FOR BLOGGING?
Since you are here and I am assuming you have already launched your blog, it’s time to get one thought out of your mind about Pinterest.
Which is, Pinterest is not a place just to get some home decor ideas, outfit ideas, hair style ideas, makeup ideas, etc. etc. etc. It’s a platform which is now going to be a source of traffic to your blog.
(Yes, when you become a blogger, you have to turn yourself into a marketer, think like a marketer and find out how you can market your business 😜)
And obviously, in order to bring traffic to your blog, you must have a website first. For your site, I recommend to go with Hostinger hosting provider to purchase your hosting and domain. It is the most affordable option.
Here’s how Pinterest works for blogging:
➤ Create a Pinterest account and optimize it
➤ Design pins
➤ Optimize those pins and add link of blog post to the pin
➤ People find your pins & visit your blog through the link
We will discuss each and every step of optimization further.
The more people find your pins, the more traffic you get to your blog. Isn’t this amazing?
Apart from getting blog traffic, you can also find other bloggers there within your niche and build relationships.
So, without a doubt, Pinterest is a must for bloggers.
HOW TO OPTIMIZE PINTEREST PROFILE: 9 EASY STEPS
Let’s discuss into brief on how to optimize Pinterest profile and bring traffic to your blog. Here are the steps at a glance.
How to optimize Pinterest profile for blogging:
➤ Create a Business account
➤ Claim your website
➤ Set profile picture
➤ Use Keywords in name & description
➤ Create relevant boards
➤ Add keywords to boards
➤ Optimize Pins
➤ Save pins to boards consistently
➤ Upload pins regularly
Let’s discuss these steps one by one in detail.
STEP 1: CREATE A BUSINESS ACCOUNT
Okay! So, the very first step is to create a business account on Pinterest. You can create a personal account too but you get so many awesome features in a business account.
But why a business account?
Here are some reasons to create a Pinterest business account:
- You can see your profile and pin analytics such as impressions, engagement, outbound clicks, saves etc.
- You can use rich pins such as Product Pins, Recipe Pins, Article Pins, and App Pins.
- You can advertise your pins and reach a larger audience.
- You can also see your audience insights such as age, gender, nationality etc.
- You can add a header, description and add your website to your profile through a business account.
- You can create video pins which is a great way to reach a large audience.
If you have an existing Pinterest account, you can just convert it into a business account and then proceed.
To convert an existing personal account to business account, go to your Pinterest profile → Edit profile → Account management → Convert account to business.
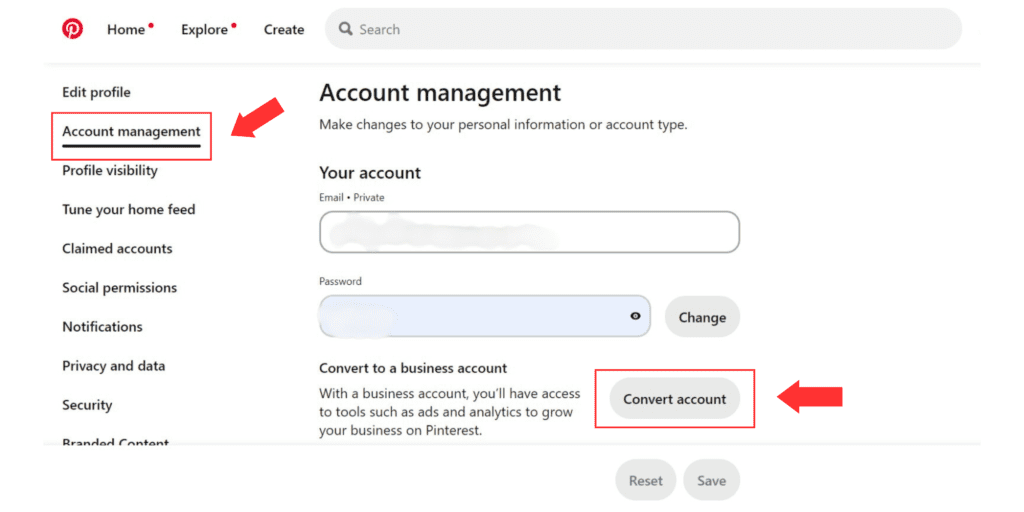
And that’s it!
To create a brand new Pinterest business account, follow these steps ↓
#1- Go to Pinterest and click on ‘Sign up’ to create a new account
#2- After clicking on sign up, click on create a business account and enter your email, password and date of birth. Then click continue.
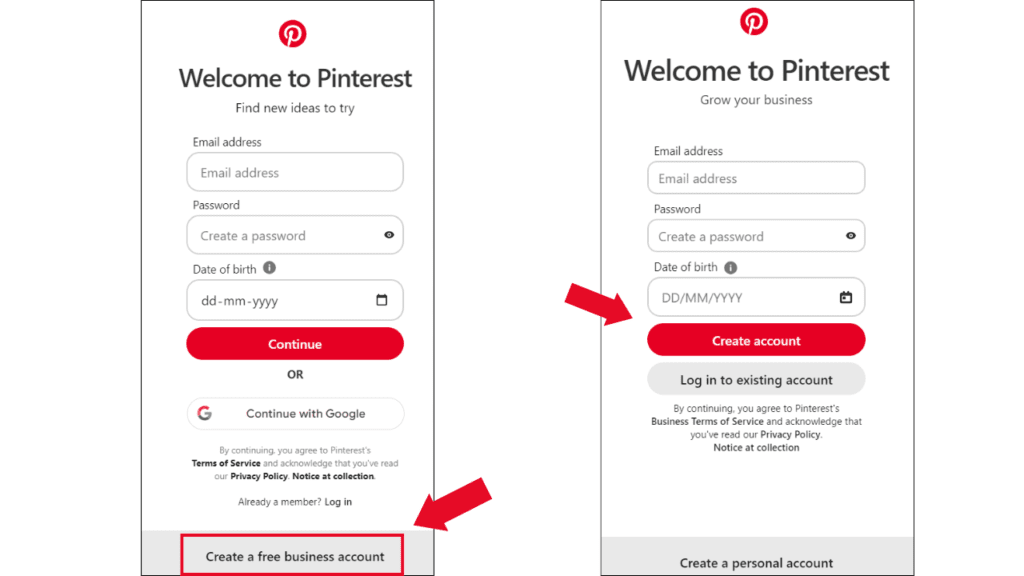
#3- And there. You have created a business account successfully.
Let’s move on to the next step.
STEP 2: CLAIM YOUR WEBSITE
You may be wondering, what’s the need to claim your website on Pinterest?
Well, there are two reasons to do so:
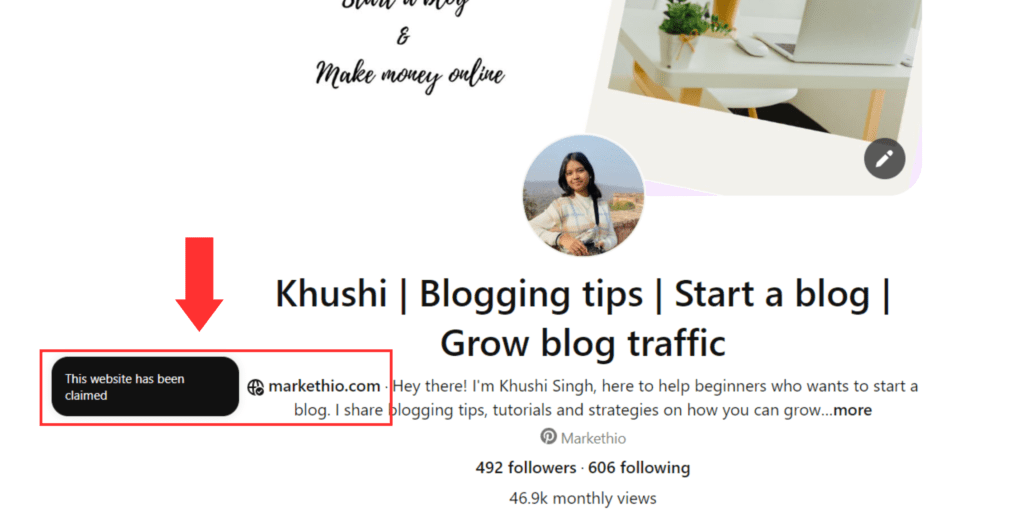
Number 1: People can easily visit your blog through your Pinterest profile and you can get some traffic through this.
Number 2: When you claim your website, your profile appears next to your pin and people can follow you without having to visit your profile. Like this ↓
Let’s learn how to claim your website:
Go to your Pinterest profile → Edit profile → Claimed accounts → Click on claim
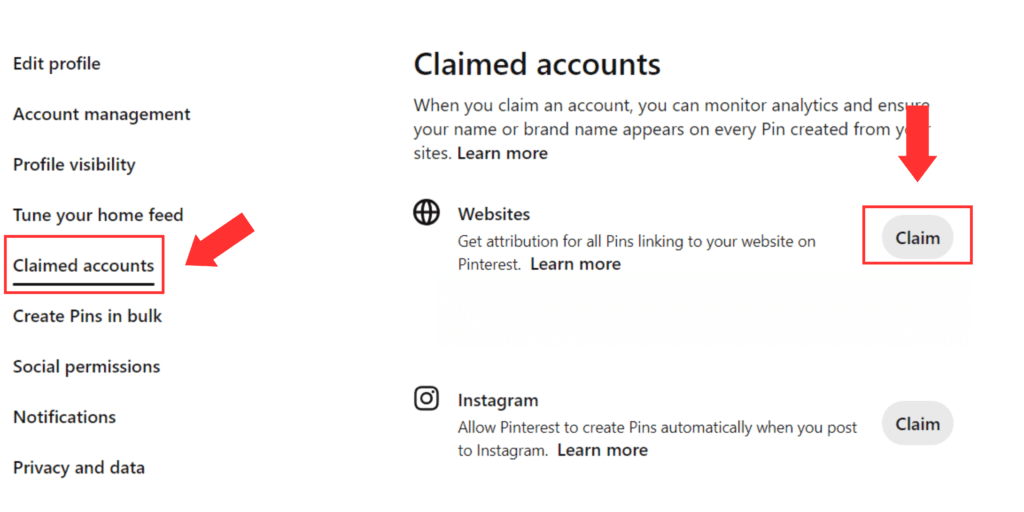
After clicking on ‘Claim’, this interface will pop up and ask you how would you like to claim your website.
As you can see, there are three ways to claim your website:
- Add HTML tag: Copy the HTML tag, log in to your dashboard and if you are using Elementor website builder then you can paste the code to the header of your website and done!
- Upload HTML file: Click on download HTML file and upload the file to the hosting dashboard. This process can differ based on the hosting service you use.
- Add TXT record: Click on continue and you’ll get a TXT record which you have to paste in the DNS records of your hosting provider. This method needs to be done carefully.
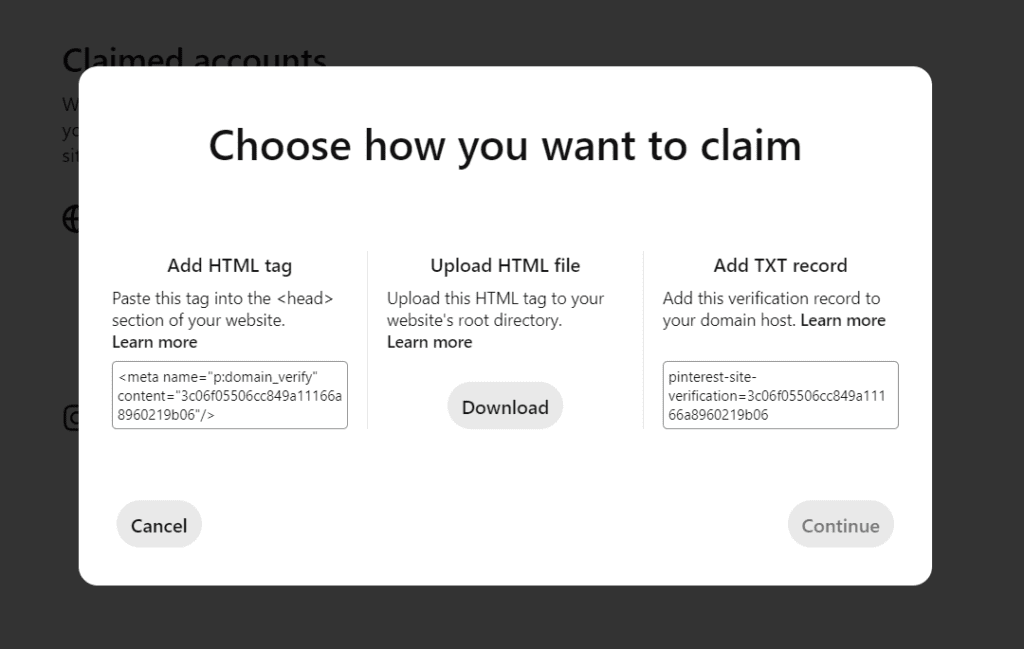
After you are done, you’ll get a success message and a confirmation email too.
Your website will appear with a tick mark on your profile like this ↓
STEP 3: SET UP YOUR PROFILE PICTURE
Now, it’s time to set up your profile picture.
For your profile picture, you can either use your own picture or your websites’ logo. But I recommend to use your own picture.
Using your own picture helps in building a good relationship with your audience. People are more likely to follow a human face more than a brand logo.
I think you got my point….
But if you are a company with multiple people working together then use your company’s logo as the profile picture.
To set a profile picture, go to your profile → edit profile → click on ‘change’ besides the profile picture → Upload picture.
But there are some things to keep in mind while choosing a good profile picture:
- Use a bright picture with good lighting
- Use a high quality picture, avoid using blurry photos
- Keep it simple
Yes, that’s it!
Most bloggers use the same Pinterest profile picture as their websites’ side bar picture so you can do that too.
STEP 4: SET YOUR NAME & DESCRIPTION AND USE KEYWORDS
You have created an account, claimed your website and set a profile picture. Great!
Now the next step is to set a name and description of your profile. This is where you have to do some research before finalizing stuff.
First things first, you’ll need at least 3 to 4 main Pinterest keywords which describes your profile and niche of your blog.
Pinterest keywords are different from normal search engines keywords.
The good thing about Pinterest is that it’s not difficult to figure out the SEO of this platform. It’s much easier to rank your content on it than Google.
All you have to do use right keywords in the right places.
To find keywords, go to the home feed on Pinterest and search something related to your niche in the search bar.
You’ll see some keyword suggestions automatically and that’s how you can do a keyword research for Pinterest.
Let’s understand this with an example:
Suppose I have a food blog in the baking niche. I want to use keywords related to baking on my Pinterest profile so I’ll search the keyword ‘baking‘ or ‘baking tips‘. Pinterest will give me the following suggestions:
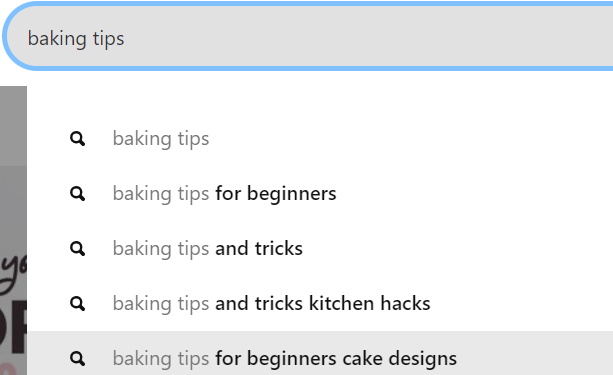
You have to use these suggested keywords in your Pinterest profile and Voila! Within some minutes, you have successfully done a keyword research.
You can also learn more about how to find Pinterest keywords here.
How to use Keywords in Name & Description:
For demonstration purposes, I am using 3 keywords for example here:
1- Baking for beginners
2- Baking Tips
3- Baking tips and tricks
To set your name: go to your profile → edit profile → Enter your name with keywords. Like this :
[Your name] | Baking for beginners | Baking tips | Baking tips and tricks
To set your description: go to your profile → edit profile → Enter your description with keywords. Like this:
Hey! I am [Your name], a [your expertise]. Here, I share content related to baking for beginners along with some baking tips and tricks.
This is just an example, you can make changes however you like.
You can also use a call-to-action in your description like ‘grab this free e-book on the website’
For inspiration, feel free to check out my Pinterest profile.
Pin this post on Pinterest for later!
STEP 5: CREATE RELEVANT BOARDS
Pinterest boards is a feature where you can save a collection of similar pins at a single place to your profile.
One of the most amazing feature of Pinterest is that you can add some pins to your profile without actually having to create your own pins.
This feature is called ‘repinning’ or ‘saving’ pins to a Pinterest board.
To create your own Board, go to your profile → go to saved tab → click on the plus icon → create board.
Give a name to your board, for example- baking tips, and add some pins to the board.
You must create up to 15-20 boards, for starters, related to your niche and in each board, you must save at least 30-40 pins. You can add as many pins you like but the minimum amount must be 30-40.
There is no particular limit of how many boards you should create but as I’ve mentioned, minimum of 15-20 boards is good to go.
You also have to optimize the Pinterest boards which we will discuss in the next step.
> Read more: 50 Best Canva Fonts for your Pinterest pins
STEP 6: ADD KEYWORDS TO BOARDS
After creating some boards, it’s time to optimize them.
But what’s the need?….
Simple. Because people can discover your pins through your boards and for better discoverability, it is a must to optimize your Pinterest boards.
This step can be a little time consuming because you have to do keyword research for each and every board. So just follow along!
Let’s start with your first board.
Do the keyword research for your first board just like I have explained earlier and write down all the Pinterest keywords related to that board.
For example: If the board contains the pins related to ‘baking tips’ then find all the keywords related to baking tips. Write them down.
Okay! Now, go to your profile → saved → click on the board → click on the 3 dots → edit board → enter the name and description of your board and add the keywords you wrote down.
Something like this ↓
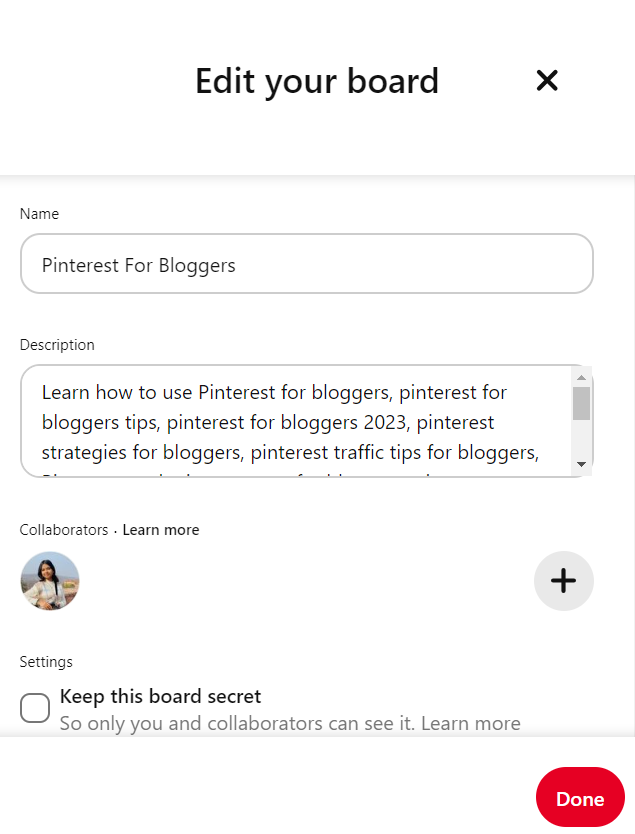
As you can see here, I entered the main keyword as the name of the board and entered all the remaining keywords in the description.
Click on ‘done’ to save the board name and description.
Now you have to repeat the same process for each board. Told you it’s a little time consuming but since Pinterest is a search engine, you have to make your content visible on it and reach a larger audience.
Also, don’t include hashtags in the board description because Pinterest will count is as spam and won’t rank it on its result pages.
STEP 7: OPTIMIZE YOUR OWN PINS
At this step, most of the optimization of your profile is complete. The only thing which is left to optimize is your own pins.
To create your own pins, you can use Canva which is a free and beginner friendly graphic design tool. I use this tool to create my own pins and without a doubt, this tool is a blessing for bloggers.
After designing your pins, it’s time to upload them on Pinterest.
To upload a pin, go to your Pinterest profile → click on the hamburger icon → create pin → upload the pin.
Use keywords in the pin title and description, add the link to the blog post, choose a board and click on publish.
For reference, take a look at this pin of mine ↓
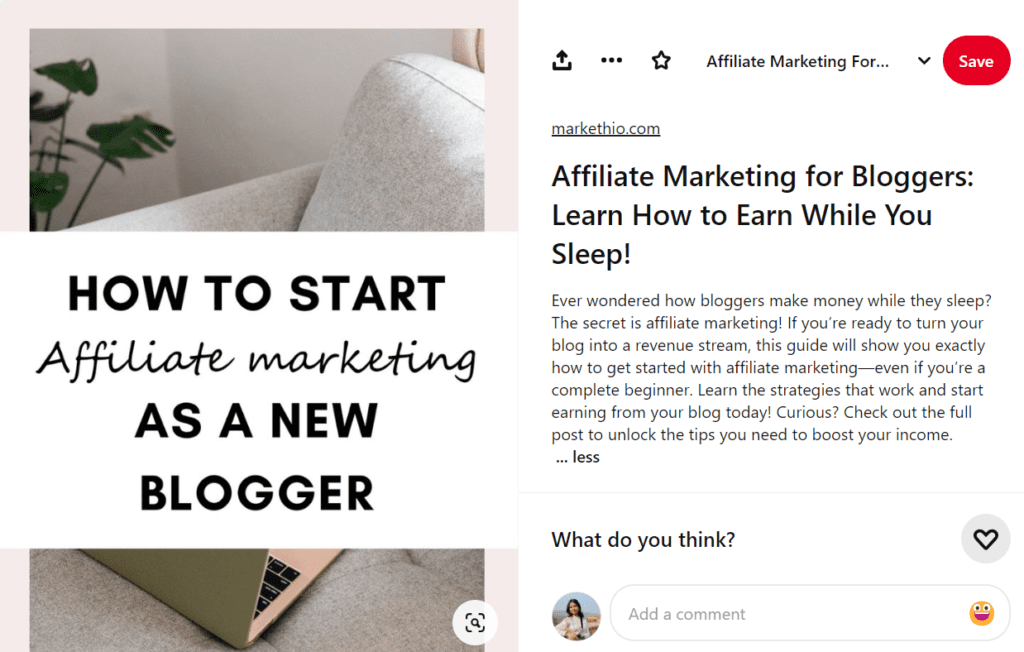
As you can see, I used the keyword ‘affiliate marketing’ in both the title and the description of the pin. You can also add a call-to-action in the description.
Please don’t use hashtags in the description or anywhere in your pin. Pinterest will count the pin as spam so please avoid this mistake!
STEP 8: REPIN CONSISTENTLY TO BOARDS
If you are completely new to the world of blogging and SEO, then you may not know that maintaining a consistency affects the ranking factor a lot. On any platform.
Pinterest loves it when you use and interact with the platform. And that’s why it is recommended to maintain a consistency to build an online community.
After you have created 10-15 boards, you can create more boards once or twice in a month and repin other peoples’ pins to those boards.
Yes, you may have to show up on Pinterest on daily basis to do this but it takes less than half an hour to repin other peoples’ pins.
But keep in mind, do not only repin other peoples’ content. Create your own too because Pinterest gives priority to fresh content more than older content.
STEP 9: UPLOAD PINS REGULARLY
As I have said before, maintaining consistency is a major ranking factor on Pinterest so try to upload pins regularly.
Maintaining consistency doesn’t mean uploading daily.
I create and upload 6 pins every alternative day. This way, not only I am maintaining consistency, I am also seeing good results while not getting burnt out.
One more thing, quality over quantity.
Pinterest is a visual search engine which means your pin designs matters a lot when it comes to getting blog traffic.
Don’t upload just for the sake of it. Do some planning. Create an image in your mind about how you want your pins to look like. Check out other peoples’ work and get some inspiration.
Winging the designs of your pins is not a very good approach. Designing is a skill and needs to be done in the right way to grab peoples attention.
To maintain consistency, you can create a content calendar to be more organized.
> Read more: How to write blog posts which people will actually read
Phew! This post turned out to be longer than I expected.
But this means, I have explained everything about Pinterest optimization right here in this blog post. I tried to give you every single information I can about Pinterest here.
Pinterest is a really amazing platform for bloggers. Who knew that you can use it to bring traffic to your blog (not me).
Just from Pinterest alone, I get thousands of monthly visitors on this site. All it takes is some knowledge and some extra efforts.
Before you started blogging, did you know that you could use Pinterest for blogging? Let me know!


Excellent and informative post. Been trying to figure out pinterest, and despite reading up, your post has some excellent information that I’ve missed. Thank you!
Your most welcome, Maya 🙂
I think I’ll try your suggestion of uploading new pins every other day to be consistent. Thanks for this!
Yes! It’s a really good way to be consistent without getting burnt out. Your welcome!